Wet plate photography was not easy. The wet-plate collodion process used between the 1850s and 1880s uses a solution of gun-cotton in ether and alcohol and requires the entire photographic process including coating the plate, exposing and developing it to be completed within fifteen minutes.
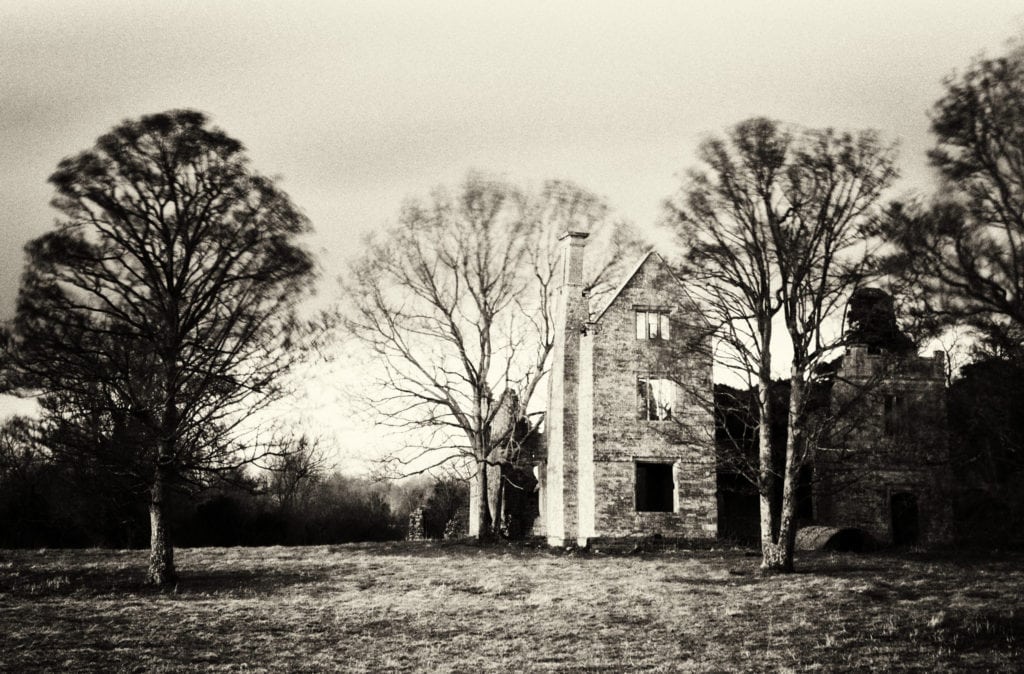
The Ruined Manor at Hampton Gay, Oxfordshire – an homage to early photography.
These and other challenges faced by early photographers were brought home to me by the a BBC documentary ‘Britain in Focus’, produced in partnership with the National Media Museum and presented by Eamonn McCabe. The first episode covered the earliest period of Photography in Britain – from polymath inventor Henry Fox Talbot in the 1840s to Peter Henry Emerson in the last years of the nineteenth century. The program surveyed some of the greatest pioneers of early photography in their most famous locations: Fox Talbot in Lacock Abbey, David Octavius Hill and Robert Adamson in Newhaven, Roger Fenton in the Crimea, Julia Margaret Cameron at Little Holland House, Robert Howlett in the Isle of Dogs and Peter Henry Emerson in the Norfolk Broads.
Roger Fenton
I was familiar with the work of most of the photographers in the program, with the exception of Roger Fenton. I was hugely impressed by his images and a little research showed him to be an extremely important photographer. Born into a wealthy banking family in 1819, he studied law at Oxford and painting in Paris before he took up photography, learning the early Calotype process developed by Fox Talbot. Fenton was a founder member of the Photographic Society (later the Royal Photographic Society), the first official photographer of the British Museum and quite possibly the world’s first officially appointed war photographer, photographing the Crimean War in the first systematic coverage of a conflict in 1855.
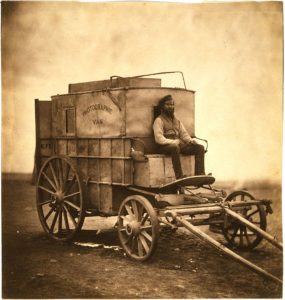
Roger Fenton’s Wagon
Wet Plate Photography in The Crimean war
Fenton’s connections led to his commission by the British government to photograph the Crimean war – a conflict that pitted the Russian Empire against a somewhat unlikely alliance of Britain, France, the Ottoman Empire, and Sardinia. He took a photographic assistant, a servant and a large horse-drawn van converted from a merchant’s wine wagon to carry his cumbersome large format wet plate photographic equipment (see image, right). The wagon offered a good target for Turkish artillery and Fenton also suffered from the high temperatures, broken ribs and cholera. Nevertheless, and despite the long exposures and rapid processing required, he was able to capture 350 images, most of which were later exhibited across Britain and displayed to the British and French royal families.
Fenton was a technically accomplished photographer and his large format images from Crimea are striking. They consist mainly of posed portraits and scenes and landscapes of battle sites including the iconic The Valley of the Shadow of Death. Though he saw plenty of horrors during the conflict, he did not record any with his camera, most likely because his government patrons wanted the images that could be used as part of a campaign to counter reports of wide spread military incompetence in a war that was unpopular with both the press and the public.
The depth of field made possible by the large format, together with marvellous tone and composition make Roger Fenton’s work quite extraordinary. In addition to his war photography he shot royal portraits, architecture, landscapes (such as those of Bolton Abbey covered in the documentary) and still life. He regarded photography as both art and business and abandoned it entirely in 1863 to return to law when he saw its status was diminished to a craft – illustrated by the 1862 International Exhibition’s placement of photography in the section reserved for instruments and machinery. He died only a few years later in 1869.
Large format film photography
Large format film images, particularly those created using wet-plate photography, have a unique look that can not be reproduced with 35mm cameras – the shot of Roger Fenton’s wagon clearly shows this. However, the supporting image in this post is an homage to it. The shot of the ruined manor at Hampton Gay (which burned down in 1887) is a long exposure (40 second exposure at f13 using a black glass ND filter) shot in windy conditions. It is sepia toned and I added some grain and lens falloff in post production. I’ve shot the manor with a few medium format cameras (6X6 and 4.5) but at some point I’d love to shoot it with a large format, preferably glass plate, camera.
The recent exhibition Fox Talbot: Dawn of the Photograph at the Science Museum in London which ended on September 11th 2016 was described as ‘magical to behold’ by Time Outand ‘ground-breaking’ by The Times. I found it extremely enjoyable as it told the story of the pioneers of early photography very capably as well as displaying a great body of their work.
Central to the story of early photography is William Henry Fox Talbot, who was born in February 1800. He attended Cambridge University in 1817 and went onto become a gentleman scientist, inventor, Egyptologist, member of parliament, mathematician, astronomer, archaeologist and transcriber of Chaldean cuneiform texts as well as a pioneer of photography.
It was a struggle with his sketchbook that put him on the road to photography: in 1833 at Lake Como in Italy, he found it difficult to capture the scenery adequately by sketching it with the aid of a Camera Lucida (an instrument used by draftsmen at the time which uses a prism to direct rays of light onto paper producing an image and from which a drawing can be made.) This started him on the journey of discovery with light-sensitive paper to automate the process that he was to pursue at his home in Lacock Abbey in Wiltshire.
Science, silver and sunlight
Investigations with silver nitrate and sunlight actually go back as far as Angelo Sala (1576-1637). Johann Heinrich Schulze (1687-1744) was the first to create photograms (a process that does not require a camera) with paper masks and Talbot would have been well aware of the work of Thomas Wedgwood (1771-1805) and Sir Humphry Davy (1778-1829) who also worked on photograms of leaves and other objects. These could not adequately fixed and faded quickly. Talbot built on this work, experimenting with plants and lace on paper coated with silver nitrate and fixing the images with salt to produce sciagraphs – drawings of shadows.
Talbot created the first negative in 1835, which minimized exposure time considerably compared to previous methods. He had help from his friend Sir John Herschel (1792-1871), one of the leading British scientists of the time, and another formidable polymath, who was an astronomer, mathematician, chemist, inventor and experimental photographer. It was Herschel who solved the problem of ‘fixing’ pictures (used by both Talbot and Daguerre) and was also the first to use the terms ‘photography’ and ‘negative’.
Inventors and pioneers
There is some debate as to is the inventor of photography or even who was the most influential of the pioneers. France can claim Nicéphore Niépce (1765-1833), inventor of a process known as heliography, who used a Camera Obscura to record an image of his country estate in 1826 via an eight-hour exposure. Better known is Louis-Jacques-Mandé Daguerre, (1787-1851), a former architect and artist who collaborated with Niépce, and who had used the Camera Obscura to assist with his paintings in his earlier career. He developed the Daguerrotype process after Niépce‘s death – a process based on light-sensitive, silver-plated copper, unique in the family of photographic process, in that the image is produced on metal directly without an intervening negative. Hippolyte Bayard (1801-1887) also holds a claim as the developer of the direct positive process and the first in the world to hold a photo exhibition. Bayard’s story embodies the struggle for recognition and adds a human dimension in the midst of all the science on show at the museum. It also serves up one of the most interesting images of the exhibition. Bayard was persuaded to postpone announcing his new positive process to the French Academy of Sciences by a friend of Daguerre, which cost him the recognition he deserved, and led him to create the first staged (or faked) photograph entitled, Self Portrait as a Drowned Man, which was on show at the Science Museum exhibition. The image portrays the photographer as a corpse, and M. Bayard wrote a fake suicide note on the back:
“The corpse which you see here is that of M. Bayard, inventor of the process that has just been shown to you. As far as I know this indefatigable experimenter has been occupied for about three years with his discovery. The Government which has been only too generous to Monsieur Daguerre, has said it can do nothing for Monsieur Bayard, and the poor wretch has drowned himself. Oh the vagaries of human life….! … He has been at the morgue for several days, and no-one has recognised or claimed him. Ladies and gentlemen, you’d better pass along for fear of offending your sense of smell, for as you can observe, the face and hands of the gentleman are beginning to decay.”
Before I went back to film with a Nikon F3 in 2016, my previous film camera was a compact APS film point and shoot Canon IXUS, from the late ’90s . My photos from that time date from before I actively studied photography and the shots aren’t the best. So my journey with film photography really started with the Nikon F3.
A Fortunate Find
Whilst staying with friends in Stockholm in 2016, I came across an Aladdin’s cave of a camera shop, which had a number of film cameras for sale, including Kodak Instamatics, Rolleiflex TLRs and Nikon SLRs, including several Nikon F3 models, some fitted with external motor drives.
The Nikon F3 model I picked out showed signs of wear and had a hole in the bottom of the body (which I later discovered was due to a missing motor drive coupling cover) but I was quite taken with it and bought it on impulse.
An Early Model
This was my first Nikon film SLR. A bit of research revealed that the F3, the successor to the legendary Nikon F (also reviewed on this site) and F2, was the last of the manual-focus, pro 35mm SLR cameras. It was introduced in 1980 and stayed in production until 2001, despite being superseded by the autofocus F4 in 1988.
That’s a long run – especially as according to Nikon’s own history, work on the F3 started back in 1973, barely two years after the debut of the Nikon F2! The formal design process started in 1977 and a prototype was ready by late 1978, which is when NASA came knocking for an automatic exposure control camera for the Space Shuttle.
A check on the serial number showed my F3 was an early model from 1981, not the more common HP (High Eyepoint) variant introduced in 1982. The HP model is identical to its predecessor except for the finder (DE-3), which allowed those wearing glasses a better view of the entire frame. This became standard on the F3, which became known as the F3HP.
Finder Trade-offs
I don’t wear glasses when shooting, preferring to use a diopter, and in this case that’s an advantage, as the trade off the HP model makes to make the whole viewfinder visible from slightly further back is fractionally lower magnification. The F3 is also slightly lighter than the HP variant as the HP finder weighs a little more, though the HP finder has slightly improved rubber sealing. Unless you wear glasses, there isn’t much in it.
Five Finders
The F3 has five finders (all interchangeable) to choose from: eye-level (DE-2), eye-level HP (DE-3), waist-level (DW-3), sport (DA-2), and high-magnification (DW-4). The F3 also offered a right-angle viewing attachment (DR-3) and an Eyepiece Magnifier (DG-2). I’ve stuck with the DE-2 my F3 came with.
F3 Exotics
Beyond models based on finder variants there are several more exotic models of the F3. The best known, is the F3/T titanium model, which is not much lighter than the regular F3 but quite desirable.
There was also a ruggedised F3P Press/Professional model, the F3 AF autofocus model and the weighty F3H F3 High Speed, a motorised speed demon that could shoot at 13 frames per second.
The autofocus Nikon F3 AF, which became available in 1983 with 2 autofocus lenses, was Nikon’s first entry in the world of AF technology. The Nikon F-501 arrived in 1986, and the Nikon F4 in 1988.
The F3 Electronics Controversy
Unlike its predecessors, which had always been entirely mechanical, the F3 uses an electronically controlled shutter which requires batteries. Electronic shutters and dependence on battery power for anything more than a light meter was initially resisted amongst Nikon professional shooters. Their initial response was to remain loyal to their fully mechanical F2s and eschew the F3.
This controversy apparently continued for years and may still continue. As one blogger wryly commented as recently as 2019: “I mean, what could possibly go wrong in attempting a dispassionate, objective analysis of two excellent SLRs made by Nikon? Oh…right…we are dealing with two groups of people: 1) those that believe that the SLR reached perfection in 1971 and everything since is an abomination against the laws of nature, aka “Knights of the Order of F2″ (referred to henceforth as KOTOOF2), and 2) everyone else.”
The fears of Nikon pros at launch turned out to be unfounded as the F3 demonstrated itself to be just as bulletproof as the F and F2. Nikon was committed to increasing reliability – as an example the F3’s shutter was designed to last an incredible 150K actuations, increased from 100K for the F and F2. However, to give photographers more confidence in the new technology Nikon built in a backup mechanical shutter into the F3 that operates at 1/60 sec.
In practice, the F3’s batteries last a very long time (compared to my Leica M6 TTL for example) and the tiny LR44s are easy to carry as spares. I also have an F2 with a Photomic head, and it is excellent, but my F3 gets used more.
The F3’s Horizontal Shutter
Another issue that the professionals weren’t keen on was the slow flash sync speed. The F3 has a horizontal travel shutter which, given the 3:2 aspect ratio of film, takes longer to operate than a vertical travel shutter. The 1/80 second maximum sync speed was the same as that of the F2, but well below the semi pro models (FA, FM2, FE2) with vertical travel shutters, which offered 1/250 second. The F3 was the last of the Nikon Pro cameras with a horizontal shutter – the F4’s went the other way.
Longevity versus Mechanical Cameras
Over time electronic components can be the Achilles heel of older film cameras and initially I thought the Nikon F3’s LCD which displays the shutter speed might be a weak spot. The display in the viewfinder, the Aperture Direct Readout (ADR), is just a display window so is not subject to deterioration, but LCDs don’t always age well. They can become harder to read over time and eventually stop working entirely. Nikon predicted they would only last about seven years or so with pro usage! 35 years after leaving the factory my well used F3’s LCD is holding up perfectly well. The F3’s manual controls also mean that the camera can still be used without the LCD display, although not with automation.
The last point to consider in the electronic vs mechanical Nikon stakes are that electronic shutters usually maintain their accuracy over time better than mechanical shutters.
F3 Surprises
One surprise to me about the F3 was that it was styled by an Italian design legend: Giorgetto Giugiaro, the man who styled the Ferrari 250 GT Bertone, the Aston Martin DB4 GT Bertone, and much else.
Another surprise was that there were Space Shuttle versions of the F3. These had large magazine backs of different capacities and various other modifications for use in space. It wasn’t the first Nikon in space however, as modified Fs were used aboard Apollo 15 and Skylab.
Upgrades and Repairs
Before I could shoot with my new purchase I needed to get it serviced and replace the missing motor drive coupling cover. Reading a little more, I learned that my camera was fitted with an unusual focusing screen, a plain matte screen which lacked the usual split image rangefinder spot.
The F3 is highly modular. Its five interchangeable viewfinders could be paired with some twenty interchangeable focusing screens. These vary from the standard central split-image microprism rangefinder screen to those for very specific use cases such as close ups, astro and architectural photography.
Mine was fitted with a Type D, which is used for close ups and with long lenses. I called Greys of Westminster and ordered the more usual Type K type rangefinder screen, a new coupling cover and a -2 diopter. The most common screen types (and my type D) are shown in the table below.
Screen Type
Description
Best For
K (Standard)
Matte/Fresnel with 3 mm split-image and 1 mm microprism collar
General photography; typical standard screen
B
Matte/Fresnel with fine-ground matte spot in the center
Telephoto lenses and precision manual focus
D
Fine-ground matte with no focusing aids
Clear, uncluttered view; macro and low-light
E
Like K but with etched grid lines
Architectural work, alignment, composition
P
Diagonal split-image, microprism collar, and grid lines
Versatile; focus aids plus composition guides
It’s easy enough to remove the F3’s finder to change the screen. Sliding the grooved buttons on each side of the finder back towards the eye piece releases the front of the finder which can then be lifted out and removed.
All that remained was to take the body into my local camera shop, imagex, who sent it away for a much needed service, at a very reasonable cost of £69.
Adjusting to the F3
It wasn’t difficult to get used to the controls of the F3. They are simple and the dials on the top plate of were familiar looking, as I was shooting with the retro styled digital Nikon Df at the time, and the F3 only offers aperture-priority automation and manual operation.
I did fire the shutter accidentally with the backup mechanical release lever (‘what does this lever do? doh!’) to the right of the lens beneath the ‘exposure memory lock’ button (AE-L on modern cameras).
LCD Display
The LCD shutter speed window in the finder isn’t especially bright and can be hard to read at times. There is a button to light it up but it’s exceptionally hard to press and gives so little additional light that it’s not worth the effort. I actually prefer the needle matching system of the FM3A, FE and FE2, though that is even harder to read in low light.
80/20 Centre Weighting
An adjustment I thought I might need to make was to get used to the heavily centre-weighted metering system, apparently a request from Nikon Pros looking for greater precision. Metering is TTL and reads the light over the whole focusing screen, but nearly all (80%) of metering sensitivity is set to the central 12mm, whilst the rest of the screen gets the remaining 20%.
Nikon accomplished this weighting in an unusual way; by putting thousands of tiny little pinholes in the reflex mirror. These allow exactly 8% of the light to pass through the mirror and onto a metering cell. This didn’t make its way into subsequent models; the F4 reverted to 60/40 weighting.
In practice the heavy centre weighting can be useful, and certainly hasn’t presented a problem, even when I forgot about it, but that maybe because I shoot with very forgiving black and white negative film.
The F3 was the first in the F series to put the meter in the camera body. Previous models, which had the meter in the prism, featured 60/40 centre-weighted metering. This is also the case with the last of Nikon’s film cameras, the rather wonderful FM3A.
One little control that isn’t at all obvious is the Multiple Exposure Lever on the far right of the top plate. This enables you re-cock the shutter without advancing the film.
First Outing with the Nikon F3
Once the camera was back from service I bought some Ilford HP5 400 film and headed for the Victoria and Albert Museum, where I shot some of the statues in various galleries, whilst I also visited the excellent Paul Strand photographic exhibition. Initially I kept looking at the back of the camera to see what I had shot, only to be greeted by cardboard film type insert on the camera back. My first keeper is shown above – I really liked the grain and the tone of film and I was hooked.
From the Nikon F3 Onwards…and Backwards
Since I bought the F3 I have acquired several other Nikon film cameras, including the mighty F6 the hybrid mechanical/electronic marvel that is the FM3A, and the FE2 – all of which you can read about in detail on this site from the preceding links.
I’ve also gone back to the start of the F series with a late F from 1970 and an F2 from 1975, both of which are excellent cameras. I particularly like the way you can see rangefinder DNA in the F’s baseplate, which evolved from the Nikon SP rangefinder. The prototype for the F was built on an SP model, adding the distinctive mirror box and pentaprism of the SLR, and a new lens mount, the F mount. The letter F comes from re-F-lex.
A scene from the Faroe Islands, shot with the Nikon F3
Though some of my photographer friends love the later Nikon F4 and F5, I have never taken to either of them – preferring either the earlier F, F2 or F3 manual focus cameras or the final F6 model.
I’ve taken the Nikon F3 with me when I’ve travelled, including some fairly harsh environments like the Faroe Islands, and it performed very well. I thought about taking my FM2n on that trip, as it is lighter, but the more rugged F3 inspired more confidence.
The Nikon F3’s Professional Successors
For those considering an F3, or perhaps one of its successors, below is a quick comparison table. For me, it is the F3 for manual exposure and the F6 for auto exposure, but that’s just my personal opinion.
Feature
Nikon F3
Nikon F4
Nikon F5
Nikon F6
Metering System
Center-weighted (80%)
Matrix (5-segment), Center-weighted, Spot (3.5mm)
3D Color Matrix, Center-weighted (customizable), Spot (4mm)
3D Color Matrix II, Center-weighted (customizable), Spot (4mm)
Light Meter Sensor
TTL via mirror/focusing screen
TTL via multi-segment SPD sensor in prism
1005-pixel RGB sensor (linked to AF and lens CPU data)
Enhanced 1005-pixel RGB sensor with i-TTL (intelligent TTL) flash and AF integration
Reflective Surface
Mirror and focusing screen
Focusing screen and multi-sensor prism system
Mirror, prism, and RGB sensor combination
Mirror, prism, and refined RGB sensor with advanced integration
First professional Nikon SLR with integrated autofocus (AM200 sensor module)
Advanced Multi-CAM1300 AF with subject tracking
Multi-CAM2000 AF with refined subject tracking and dynamic AF area
Viewfinder Display
LCD metering display
LCD display with comprehensive exposure info
Advanced LCD viewfinder info with customizable grid
Bright, high-contrast LCD with customizable data display
The Go Anywhere F3
The Nikon F3 remains one of my favourite manual Nikon film cameras. Unlike other more expensive classics, such as Leica M6 or Nikon FM3A, which most photographers (including me) fret about in use, my F3 presents no worries at all. It is extremely rugged, affordable to service (or replace), and easy to use.
I bought it slightly beaten up and it’s so tough I am comfortable taking it anywhere. I have 50mm and 28mm (Voigtländer) pancake lenses to keep the form factor to a minimum – the F3 and both pancake lenses easily fit into a small camera bag. It is versatile: the shutter is fast (up to 1/2000 second), and though I haven’t needed them to date, there is a PC connection (though a flash requires an adaptor), and it will take a standard cable release. It takes great pictures. What more could you ask for?
Black and white images often possess a timeless quality that is more difficult to achieve with colour images. This is largely because colour provides more visual clues as to when a photograph was taken.
Variance in the colours themselves can sometimes suggest a specific era – the difference between the colour renditions of the 1970s for example, and today are often clearly discernible; this is due to differences in colour processing, which have changed significantly over time.
Printed colour images may also be subject to varying degrees of instability as they age, which is also helpful in dating them.
The Advance of Colour Film
The first permanent colour photograph was taken in the 1860s using the colour separation, a method which required shooting three separate black and white photos using three different coloured filters. These were then projected together to create a colour image.
By the first decade of the twentieth century colour separation using the Autochrome process which used millions of tiny colour filters made of potato starch spread over the surface of a plate of glass was available.
In the 1930s multi-layered colour film was developed, the first of which was Kodachrome. The 1960s saw the development of instant photographs by Polaroid, and in the 1970s the C-41 chromogenic colour negative process replaced the C-22 process that Kodak had introduced in the 1950s. For more on the history of photographic processes, see the article on this site ‘From Chemistry to Computation’
It was not until the 1970’s that colour photography became the form of photography. Monochrome photography continued but in niche markets such as fine art.
The Advent of Digital
With the advent of digital photography the clues provided by film have disappeared, but colour is also an element of fashion which inevitably gives a better sense of when the picture was taken. Regardless of changes in fashion, colour provides a level of detail absent from black and white pictures – there is just less information for us to process, making a picture more difficult to date. This is helpful in many genres of photography but is especially so for travel, street and portrait photography. Whilst we know the approximate date we took our pictures, if when these photos were taken is difficult to discern, it seems to imbue them with additional value. Why this should be a virtue is largely attributable to the notion of the ‘classic’ – something long-standing that does not date with age. Synonyms of the word classic give us a clue to the value implied by the term: simple, elegant, understated, uncluttered, restrained, time-honoured, timeless, ageless, abiding, enduring and immortal. Portrait photographer Anne Geddes made the point well when she said: “The best images are the ones that retain their strength and impact over the years, regardless of the number of times they are viewed.”
Photographing souls
Another aspect of timelessness, although more subjective, is that many photographers consider black and white photography promotes a stronger emotional connection with people. Canadian photographer Ted Grant’s quote on this is well known: “When you photograph people in color, you photograph their clothes. But when you photograph people in black and white, you photograph their souls!“
Souls being more durable and important than clothes (to all but the fashion industry!) this quality naturally creates a more timeless photograph.
The Weight of History
Another factor is that because black and white photography preceded colour, many of the pioneers of photography from Adams to Weston including many pioneering women, shot in black and white . Monochrome images were dominant beyond photography’s formative years – leading the way for the first 120 years or so of photography’s history. This resulted in a huge number of iconic black and white images and creates a significant pedigree and a degree of nostalgia for what is now a genre rather than a technology.
The accompanying photo is of Newcastle based photographer Irena Childers and was shot in Garth Park, Bicester, as part of a camera club shoot. It is a digital shot but it strikes me that the picture could have been taken at any time between from 1950 and the present day. This only became apparent when I performed the mono conversion with Silver Efex. The colour version just didn’t have the same timeless quality…
This is the oldest picture on this website and the beginning of my black and white photography journey.
It was taken on 110 film in 1987 and originally shot in colour.
The mono conversion came about because a friend at work was attending a photography class and was asking around for pictures he could use.
I had recently visited Ávila whilst in Madrid, staying with friend who had moved out there. This shot of the walls was the best I could find. I was amazed by what he did with it. He cropped it, converted it to monochrome and added some additional grain. At the time I just took snapshots, so this was a revelation to me. I consider this my first decent picture and my first step into black and white photography – a medium I have come to love. I still like the image; the absence of anything else in frame, the brooding sky, the way the walls stretch off into the distance and, of course, the subject itself, the mighty, pristine walls, are what make the picture work.
Ávila, the ‘City of Saints and Stones, was founded in the 11th century to protect the Spanish territories from the Moors. It is the capital of the province of the same name in Castile and León in North West Spain, 110 km from Madrid and separated from the capital by the Guadarrama mountain chains. It is 74 km from Segovia. At 1,126 meters above sea level, it is the highest provincial capital in Spain and sits on the top of a rocky outcrop in the midst of a barren, stone covered plain.
The medieval walls were built between the 11th-14th centuries and are astonishingly well preserved and the most complete fortifications in Spain. They stretch for 2.5km, stand an average of 12 metres in height, enclose area is 31 hectares (77 acres) and have 9 gates. The Old Town of Ávila has been designated a World Heritage Site by UNESCO, largely due to the walls which are its most impressive monument but also for its 12th Century cathedral and Romanesque churches. I want to go back and shoot Ávila at night, as it is beautifully illuminated – apparently it is the largest fully illuminated monument in the world.
This site counts visits with Google Analytics, which needs one cookie. Nothing here identifies you, and nothing is passed on. Say no and the site will still work fine.
Functional
Always active
The technical storage or access is strictly necessary for the legitimate purpose of enabling the use of a specific service explicitly requested by the subscriber or user, or for the sole purpose of carrying out the transmission of a communication over an electronic communications network.
Preferences
The technical storage or access is necessary for the legitimate purpose of storing preferences that are not requested by the subscriber or user.
Statistics
The technical storage or access that is used exclusively for statistical purposes.The technical storage or access that is used exclusively for anonymous statistical purposes. Without a subpoena, voluntary compliance on the part of your Internet Service Provider, or additional records from a third party, information stored or retrieved for this purpose alone cannot usually be used to identify you.
Marketing
The technical storage or access is required to create user profiles to send advertising, or to track the user on a website or across several websites for similar marketing purposes.
 It’s been a while…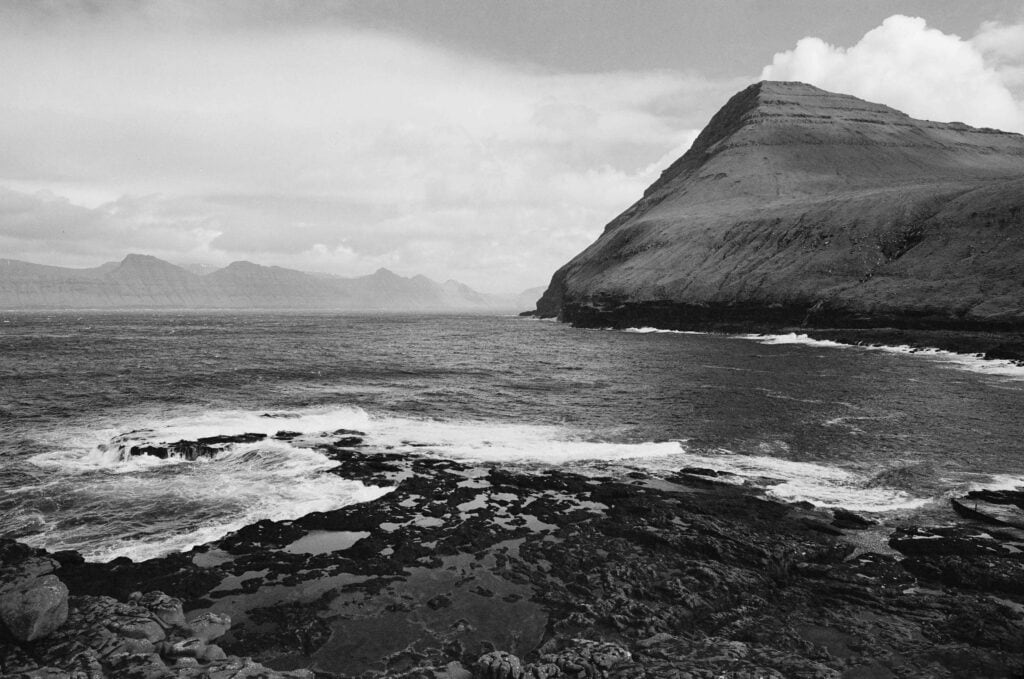

 This is the oldest picture on this website and the beginning of my black and white photography journey.