Las Vegas is undoubtedly one of the stranger places in the USA. Its sheer scale, the juxtaposition of replicas of famous landmarks, the relentless 24 hour gambling and the fantasy element of the place all contribute to that strangeness. It is also hard for me to get over it’s origins, summarised here by history.com:
A desert metropolis built on gambling, vice and other forms of entertainment…the city was founded by ranchers and railroad workers but quickly found that its greatest asset was not its springs but its casinos. Las Vegas’s embrace of Old West-style freedoms—gambling and prostitution—provided a perfect home for East Coast organized crime. Beginning in the 1940s, money from drugs and racketeering built casinos and was laundered within them. Visitors came to partake in what the casinos offered: low-cost luxury and the thrill of fantasies fulfilled.
The chain of events that led to Mafia involvement in the development of the city is straightforward enough. The state of Nevada legalized gambling in 1931, but no one paid attention until after World War II, when the Mafia, in the form of Meyer Lansky and Bugsy Siegel, saw business potential. Siegel opened the showcase 105 room Flamingo Hotel and Casino in December 1946 and whilst he paid the ultimate price for skimming from Mafia operations the Flamingo was successful under Lansky and other crime families moved in. Properties such as the 1,000 room Stardust, the Desert Inn, and the Riviera followed. In 1959 the Revolution in Cuba removed President Batista, who had been in league with Lansky, and with him the gambling concessions he had made to the mafia. It also made Havana a no go destination for many high rollers who re-routed to Las Vegas, accelerating its development. Today a significant proportion of the largest hotels in the world are on situated the Strip.
Downtown
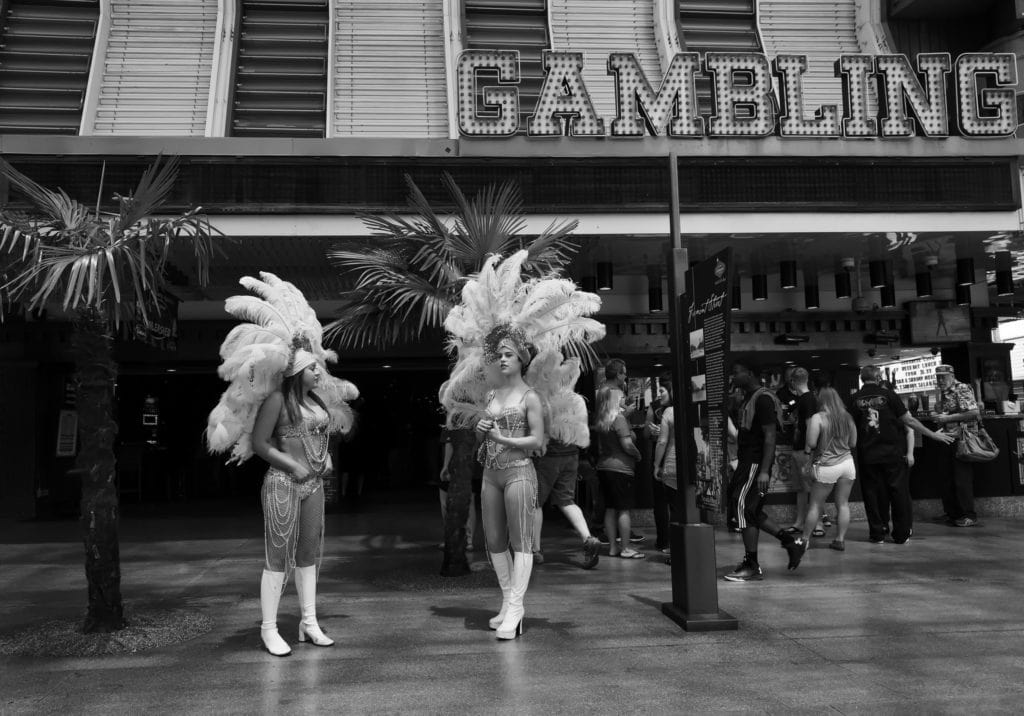
Downtown Las Vegas, the original site of the town and gambling district of Las Vegas, centres on Fremont Street. It has had significant investment of late but still appears to be the poor relation to The Strip, or offers a more vintage experience, depending on your perspective. On one trip I had breakfast with a fellow photographer before heading out to Fremont Street and we discussed our approaches to photography. Fred is an out-and-out street photographer; his interest is in people, pure and simple and he has a practised technique to get in close and yet not be noticed. I work differently as I am very interested in the relationship between the background and people in the frame. I suppose that makes me more of a travel photographer; I want to capture something of the spirit of place wherever I am at the time. In the shot here I wanted to combine the large ‘Gambling’ sign with the women dressed as show girls. For this shot I used a circular polariser, which required an ISO setting of 2,500 for f8, but the boost in contrast was worth it. The noise the Leica Q produces is relatively filmic and if it appears excessive I apply Topaz DeNoise. The other shots from my various trips to the desert metropolis are in the Las Vegas gallery.
When a friend of mine purchased a Sony RX1 in 2016 I thought it was way to much to spend on a compact camera. At £2,700 this was no trivial purchase and so I looked closely at cheaper options: the Fujifilm X100T and Olympus OMD 5 Mk II. Both of these cameras have retro looks and plenty of external controls, which personally I prefer and were far less expensive than the Sony. The Leica Q was not on my list.
Temptation
Then I read started to read reviews of the Leica Q. Pocket-Lint described it as “the best fixed-lens full-frame compact ever made” but it was Craig Mod‘s blog that really got me thinking. It was a six month field test in Asia and was one of the positive and compelling reviews I have ever read of a camera.
“Make no mistake: The Q is a surgical, professional machine. It pairs best-of-class modern technology (superb autofocus, an astounding electronic view finder, workable isos up to and beyond 10,000, a fast processor, beefy sensor) with a minimalist interface packed into a small body, all swaddled in the iconic industrial design for which Leica has become famous. The result is one of the least obtrusive, most single-minded image-capturing devices I’ve laid hands on.”
“If the gf1 so many years ago set in motion an entirely new genre of camera with micro four-thirds, the Q epitomizes it. If the iPhone is the perfect every person’s mirrorless, then the Q is some specialist miracle. It should not exist. It is one of those unicorn-like consumer products that so nails nearly every aspect of its being — from industrial to software design, from interface to output — that you can’t help but wonder how it clawed its way from the r&d lab. Out of the meetings. Away from the committees. How did it manage to maintain such clarity in its point of view?”
I believe that in hindsight… the Leica Q will be seen as one of the greatest fixed-prime-lens travel photography kits of all time.”
After reading that review I realised I wanted a Leica Q quite badly – but at close to £3,000 could I justify the purchase?
A demanding specification
Thinking through what I really wanted out of a large sensor compact I came up with a fairly demanding specification:
Large sensor (full frame if possible, but no smaller than APS-C)
Silent shutter operation
Usable at high ISO
A sharp, fast lens preferably with image stabilisation
Fast autofocus
Effective viewfinder
Good handling/ergonomics
Durable magnesium alloy construction
Weather proof
Good battery life
Decent burst performance
Value for money
The Leica Q has all this nailed except for weather sealing. That said, Craig Mod’s review indicated it was pretty tough:
“Over these last six months, the Q joined me while on assignment in South Korea, trekking across Myanmar, hiking the mountains of Shikoku, and spending a few freezing nights on Mt. Kōya. It was used in searing heat, 100% humidity, covered in sweat amid rice fields beneath a relentless sun…. The Q is small but substantial. Solid. It becomes an effortless all-day companion. Strapped across my chest, it was banged sideways against rocks, motorcycles, stone walls, metal water bottles, farmers, cats. It captured everything thrown at it and into it.”
Purchasing The Leica Q
I attended the Photography Show and after testing some of Nikon’s newest gear, went to the Leica stand to see if I could get my hands on one. There was one to hand and it didn’t take me long to decide that I really wanted one. The lens was astonishingly sharp, the build quality was rock solid and the camera was a joy to handle. The good people at Leica told me that the London Camera Company had six Qs on their stand to sell at the show, so I went and promptly bought one – the alternative being a lengthy waiting list. I wondered whether I would suffer buyer’s remorse afterwards – at £2,900 the Q is by far the most expensive camera purchase I had ever made.
Q Results
My experience with the Q, and its successor the Q2, has really been an extension of my first touch of the camera – it is a delight to use. It took me quite a while to get over how sharp the f1.7 lens is – I believe it is the sharpest lens I own. What I also found is that the camera can be remote controlled from my iPhone, which has permitted some street shots that I would not have got otherwise and that I could compose in high contrast black and white whilst simultaneously shooting in raw.
The shot of the boats in Folkestone harbour is straight from the camera. The image at top is of some objects for sale in Deal Market as was shot at f1.7 focusing on the statuette at the back of the table and shows the almost 3D effect a fast, very sharp lens can produce. Here is my summary of how the Q met my requirements:
Value for money – Leica’s 28mm f/1.4 retails at £3,900 with the f/2 costing £2,700. £2,900 for a full frame camera plus an f1.7 lens suddenly seems quite reasonable
Fast burst performance – 10 fps burst
Good battery life – 300 shots (Leica/CIPA tests) which is decent
Weather proof – sadly the Leica Q is not weather sealed
Durable magnesium alloy construction – a milled aluminium top and base plates and a magnesium alloy body provide an unrivalled quality feel
Good handling/ergonomics – The camera is built in Germany, the home of the Leica M. There is a good thumb grip on the back, and the optional grip is excellent. The controls are well laid out with an excellent tactile feel to them.
Effective viewfinder – The Q’s viewfinder is electronic rather than optical, but it does a pretty good job of mimicking an the optical EVF with its high resolution EVF, which at (3.68 megapixel resolution is the highest currently available.
Fast autofocus – The Leica Q is the first full-frame Leica to incorporate an autofocus system. It has a 49-point system with multi, 1-point, tracking, face-detection and touch AF.
A sharp, fast lens preferably with image stabilisation – f1.7, 5 axis stabilisation
Usable at high ISO – up to 6,400 in my estimation with film like grain
Silent shutter operation – leaf shutter for close to silent operation (1/2000s)
Large sensor – 24 megapixel full frame sensor with no optical low-pass filter for improved detail and tone mapping
And here are some of the extra’s I didn’t expect.
Remote control from iPhone via the Leica Q App
Rapid transfer of images of to iPhone via the Leica Q App
Ability to shoot wide open in bright conditions due to the electronic shutter (1/16000s)
Excellent monochrome setting, which allows high contrast mono JPEGS to be captured along with full colour RAW images
The Outstanding macro mode with 17cm minimum focus distance, activated from the control ring on the lens. The distance markings on the lens change to a new set of macro markings in a way that really exemplifies engineering excellence.
The aperture is controlled by a ring situated at the front of the lens (as with any M lens) and is astonishingly pleasing to handle and use
Excellent bokeh, especially for a relatively wide angle lens
The lens hood is incredibly solid and attractive – it is similar to the M’s Summarit 35mm
For a compact camera the Leica Q is quite substantial – it is not, by any means a pocket camera at 130 x 80 x 93mm and 640g. The purchase price is the same, but more so – it is very substantial! However, it is the best camera I have ever owned, and for me, an important step forward in camera development. I am shooting more and shooting differently – in street photography the 28mm makes you get in close (like Robert Capa and William Klein) and that means I am shooting better with the Leica Q and that is worth a lot to me.
Postscript – The Q2 and Back to Film
My Q was stolen in London – somehow thieves hooked the camera bag out from under the table where I had put it in a London pub. I I was sad about it as it had been all over the world with me – as described in Around the World With a Leica Q. The upside is the Q2 had just become available and I upgraded, giving me both weather proofing and the ability to crop in a little more, because of the larger sensor.
During lockdown I got back into film photography. I wasn’t sure about rangefinders so I started out with a low cost option – a Yashica GSN, which is a great way to get started. Finding that I got on with the Yashica well, I saved for a M6 TTL which I have enjoyed shooting with ever since. I have not switched from Nikon for a removable lens system as the cost of the many lenses I use is prohibitive, so the Q2 is the only digital Leica I own, but for street, travel and general purpose photography it remains my go to camera. so is the Leica worth it? With the built in Summilux the Q2 offers, I say it is.
Before I went back to film with a Nikon F3 in 2016, my previous film camera was a compact APS film point and shoot Canon IXUS, from the late ’90s . My photos from that time date from before I actively studied photography and the shots aren’t the best. So my journey with film photography journey really started with the Nikon F3.
A Fortunate Find
Whilst staying with friends in Stockholm in 2016, I came across an Aladdin’s cave of a camera shop, which had a number of film cameras for sale, including Kodak Instamatics, Rolleiflex TLRs and Nikon SLRs, including several Nikon F3 models, some fitted with external motor drives.
The Nikon F3 model I picked out showed signs of wear and had a hole in the bottom of the body (which I later discovered was due to a missing motor drive coupling cover) but I was quite taken with it and bought it on impulse.
An Early Model
This was my first Nikon film SLR. A bit of research revealed that the F3, the successor to the legendary Nikon F (also reviewed on this site) and F2, was the last of the manual-focus, pro 35mm SLR cameras. It was introduced in 1980 and stayed in production until 2001, despite being superseded by the autofocus F4 in 1988.
That’s a long run – especially as according to the MIR site, work on the F3 started back in 1974, barely three years after the debut of the Nikon F2! The formal design process started in 1977 and a prototype was ready by late 1978, which is when NASA came knocking for an automatic exposure control camera for the Space Shuttle.
A check on the serial number showed my F3 was an early model from 1981, not the more common HP (High Eyepoint) variant introduced in 1982. The HP model is identical to its predecessor except for the finder (DE-3), which allowed those wearing glasses a better view of the entire frame. This became standard on the F3, which became known as the F3HP.
Finder Tradeofs
I don’t wear glasses when shooting, preferring to use a diopter, and in this case that’s an advantage, as the trade off the HP model makes to make the whole viewfinder visible from slightly further back is fractionally lower magnification. The F3 is also slightly lighter than the HP variant as the finder HP finder weighs a little more, though the HP finder has slightly improved rubber sealing. Unless you wear glasses, there isn’t much in it.
Five Finders
The F3 has five finders (all interchangeable) to choose from: eye-level (DE-2), eye-level HP (DE-3) waist-level (DW-3), sport (DA-2), and high-magnification (DW-4). The F3 also offered a right-angle viewing attachment (DR-3) and an Eyepiece Magnifier (DG-2). I’ve stuck with the DE-2 my F3 came with.
F3 Exotics
Beyond models based on finder variants there are several more exotic models of the F3. The best known, is the F3/T titanium model, which not much lighter than the regular F3 but quite desirable.
There was also a ruggedised F3P Press/Professional model, the F3 AF autofocus model and the weighty F3H F3 High Speed, a motorised speed demon that could shoot at 13 frames per second.
The autofocus Nikon F3 AF, which became available in 1983 with 2 autofocus lenses, was Nikon’s first entry in the world of AF technology. The Nikon F-501 arrived in 1986, and the Nikon F4 in 1988.
The F3 Electronics Controversy
Unlike its predecessors, which had always been entirely mechanical, the F3 uses an electronically controlled shutter which requires batteries. Electronic shutters and dependence on battery power for anything more than a light meter was initially resisted amongst Nikon professional shooters. Their initial response was to remain loyal to their fully mechanical F2s and eschew the F3.
This controversy apparently continued for years and may still continue. As one blogger wryly commented as recently as 2019: “I mean, what could possibly go wrong in attempting a dispassionate, objective analysis of two excellent SLRs made by Nikon? Oh…right…we are dealing with two groups of people: 1) those that believe that the SLR reached perfection in 1971 and everything since is an abomination against the laws of nature, aka “Knights of the Order of F2″ (referred to henceforth as KOTOOF2), and 2) everyone else.”
The fears of Nikon pros at launch turned out to be unfounded as the F3 was demonstrated itself to be just as bulletproof as as the F and F2. Nikon was committed to increasing reliability – as an example the F3’s shutter was designed to last an incredible 150K actuations, increased from 100K for the F and F2. However, to give photographers more confidence in the new technology Nikon built in a backup mechanical shutter into the F3 that operates at 1/60 sec.
In practice, the F3’s batteries last a very long time (compared to my Leica M6 TTL for example) and the tiny LR44s are easy to carry as spares. I also have an F2 with a Photomic head, and it is excellent, but my F3 gets used more.
The F3’s Horizontal Shutter
Another issue that the professionals weren’t keen on was the slow flash sync speed. The F3 has a horizontal travel shutter which, given the 3:2 aspect ratio of film, takes longer to operate than a vertical travel shutter. The 1/80 second maximum sync speed was the same as that of the F2, but well below the semi pro models (FA, FM2, FE2) with vertical travel shutters, which offered 1/250 second. The F3 was the last of the Nikon Pro cameras with a horizontal shutter – the F4’s went the other way.
Longevity versus Mechanical Cameras
Over time electronic components can be the Achilles heel of older film cameras and initially I thought the Nikon F3’s LCD which displays the shutter speed might be a weak spot. The display in the viewfinder, the Aperture Direct Readout (ADR), is just a display window so is not subject to deterioration, but LCDs don’t always age well. They can become harder to read over time and eventually stop working entirely. Nikon predicted they would only last about seven years or so with pro usage! 35 years after leaving the factory my well used F3’s LCD is holding up perfectly well. The F3’s manual controls also mean that the camera can still be used without the LCD display, although not with automation.
The last point to consider in the electronic vs mechanical Nikon stakes are that electronic shutters usually maintain their accuracy over time better than mechanical shutters.
F3 Surprises
One surprise to me about the F3 was that it was styled by an Italian design legend: Giorgetto Giugiaro, the man who styled the Ferrari 250 GT Bertone, the Aston Martin DB4 GT Bertone, and much else.
Another surprise was that there were Space Shuttle versions of the F3. These had large magazine backs of different capacities and various other modifications for use in space. It wasn’t the first Nikon in space however, as modified Fs were used aboard Apollo 15 and Skylab.
Upgrades and Repairs
Before I could shoot with my new purchase I needed to get it serviced and replace the missing motor drive coupling cover. Reading a little more, I learned that my camera was fitted with an unusual focusing screen, a plain matte screen which lacked the usual split image rangefinder spot.
The F3 is highly modular. It’s 5 interchangeable viewfinders could be paired with 15 interchangeable focusing screens. These vary from the standard central split-image microprism rangefinder screen to those for very specific use cases such as close ups, astro and architectural photography.
Mine was fitted with a Type D, which is used for close ups and with long lenses. I called Greys of Westminster and ordered the more usual Type K type rangefinder screen, a new coupling cover and a -2 diopter. The most common screen types (and my type D) are shown in the table below.
Screen Type
Description
Best For
K (Standard)
Matte/Fresnel with 3 mm split-image and 1 mm microprism collar
General photography; typical standard screen
B
Matte/Fresnel with fine-ground matte spot in the center
Telephoto lenses and precision manual focus
D
Fine-ground matte with no focusing aids
Clear, uncluttered view; macro and low-light
E
Like K but with etched grid lines
Architectural work, alignment, composition
P
Diagonal split-image, microprism collar, and grid lines
Versatile; focus aids plus composition guides
It’s easy enough to remove the F3’s finder to change the screen. Sliding the grooved buttons on each side of the finder back towards the eye piece releases the front of the finder which can then be lifted out and removed.
All that remained was to take the body into my local camera shop, imagex, who sent it away for a much needed service, at a very reasonable cost of £69.
Adjusting to the F3
It wasn’t difficult to get used to the controls of the F3. They are simple and the dials on the top plate of were familiar looking, as I was shooting with the retro styled digital Nikon Df at the time, and the F3 only offers aperture-priority automation and manual operation.
I did fire the shutter accidently with the backup mechanical release lever (‘what does this lever do? doh!’) to the right of the lens beneath the ‘exposure memory lock’ button (AE-L on modern cameras).
LCD Display
The LCD shutter speed window in the finder isn’t especially bright and can be hard to read at times. There is button to light it up but its exceptionally hard to press and gives so little additional light that its not worth the effort. I actually prefer the needle matching system of the FM3A, FE and FE2, though that is even harder to read in low light.
80/20 Centre Weighting
An adjustment I thought I might need to make was to get used to the heavily centre-weighted metering system, apparently a request from Nikon Pros looking for greater precision. Metering is TTL and reads the light over the whole focusing screen, but nearly all (80%) of metering sensitivity is set to the central 12mm, whilst the rest of the screen gets the remaining 20%.
Nikon accomplished this weighting in an unusual way; by putting thousands of tiny little pinholes in the reflex mirror. These allow exactly 8% of the light to pass through the mirror and onto a metering cell. This didn’t make it’s way into subsequent models; the F4 reverted to 60/40. weighting.
In practice the heavy centre weighting can be useful, and certainly hasn’t presented a problem, even when I forgot about it, but that maybe because I shoot with very forgiving black and white negative film.
The F3 was the first in the F series to put the meter in the camera body. Previous models, which had the meter in the prism, featured 60/40 centre-weighted metering. This is also the case with the last of Nikon’s film cameras, the rather wonderful FM3A.
One little control that isn’t at all obvious is the Multiple Exposure Lever on the far right of the top plate. This enables you re-cock the shutter without advancing the film.
First Outing with the Nikon F3
Once the camera was back from service I bought some Ilford HP5 400 film and headed for the Victoria and Albert Museum, where I shot some of the statues in various galleries, whilst I also visited the excellent Paul Strand photographic exhibition. Initially I kept looking at the back of the camera to see what I had shot, only to be greeted by cardboard film type insert on the camera back. My first keeper is shown above – I really liked the grain and the tone of film and I was hooked.
From the Nikon F3 Onwards…and Backwards
Since I bought the F3 I have acquired several other Nikon film cameras, including the mighty F6 the hybrid mechanical/electronic marvel that is the FM3A, and the FE2 – all of which you can read about in detail on this site from the preceding links.
I’ve also gone back to the start of the F series with a late F from 1970 and an F2 from 1975, both of which are excellent cameras. I particularly like the way you can see rangefinder DNA in the F’s baseplate, which evolved from the Nikon SP rangefinder. The prototype for the F was built on an SP model, adding the distinctive mirror box and pentaprism of the SLR, and a new lens mount, the F mount. The letter F comes from re-F-lex.
A scene from the Faroe Islands, shot with the Nikon F3
Though some of my photographer friends love the later Nikon F4 and F5, I have never taken to either of them – preferring either the earlier F, F2 or F3 manual focus cameras or the final F6 model.
I’ve taken the Nikon F3 with me when I’ve travelled, including some fairly harsh environments like the Faroe Islands, and it performed very well. I thought about taking my FM2n on that trip, as it is lighter, but the more rugged F3 inspired more confidence.
The Nikon F3’s Professional Successors
For those considering an F3, or perhaps one of its successors, below is a quick comparison table. For me, it is the F3 for manual exposure and the F6 for auto exposure, but that’s just my personal opinion.
Feature
Nikon F3
Nikon F4
Nikon F5
Nikon F6
Metering System
Center-weighted (80%)
Matrix (5-segment), Center-weighted, Spot (3.5mm)
3D Color Matrix, Center-weighted (customizable), Spot (4mm)
3D Color Matrix II, Center-weighted (customizable), Spot (4mm)
Light Meter Sensor
TTL via mirror/focusing screen
TTL via multi-segment SPD sensor in prism
1005-pixel RGB sensor (linked to AF and lens CPU data)
Enhanced 1005-pixel RGB sensor with i-TTL (intelligent TTL) flash and AF integration
Reflective Surface
Mirror and focusing screen
Focusing screen and multi-sensor prism system
Mirror, prism, and RGB sensor combination
Mirror, prism, and refined RGB sensor with advanced integration
First Nikon SLR with integrated autofocus system (Multi-CAM 1300)
Advanced Multi-CAM1300 AF with subject tracking
Multi-CAM2000 AF with refined subject tracking and dynamic AF area
Viewfinder Display
LED metering display
LCD display with comprehensive exposure info
Advanced LCD viewfinder info with customizable grid
Bright, high-contrast LCD with customizable data display
The Go Anywhere F3
The Nikon F3 remains one of favourite manual Nikon film cameras. Unlike other more expensive classics, such as Leica M6 or Nikon FM3A, which most photographers (including me) fret about in use, my F3 presents no worries at all. It is extremely rugged, affordable to service (or replace), and easy to use.
I bought it slightly beaten up and it’s so tough I am comfortable taking it anywhere. I have 50mm and 28mm (Voigtländer) pancake lenses to keep the form factor to a minimum – the F3 and both pancake lenses easily fit into a small camera bag. It is versatile: the shutter is fast (up to 1/2000 second), and though I haven’t needed them to date, there is a PC connection (though a flash requires an adaptor), and it will take a standard cable release. It takes great pictures. What more could you ask for?
The exact date of the foundation of the city of Oxford is uncertain, but the place is ancient.
It was probably first laid out in the 890s by Aethelred, ealdorman of Mercia, or by his successor Aethelflaed ‘The Lady of the Mercians’. Sited on an important crossing point across the Thames, which formed the frontier between the Anglo-Saxon kingdoms of Wessex and Mercia, Oxford started as a ford for oxen (Oxenaforda) long before it had an urban identity.
A religious community also preceded the town. It grew up after the death of the Mercian Princess Frideswide in 727. Her church was destroyed in the St Brice’s Day massacre, a priory was built in its place and dedicated to her as St Fridewide’s Priory. This would eventually become Oxford’s Cathedral, where her shrine remains.
Saxon Oxford
Oxford first appears in a document in c.900 in a list of fortified Saxon towns called the Burghal Hidage, and was mentioned in the shortly afterwards in the Anglo-Saxon Chronicle for the year 912. The Saxon streets of Oxford intersected at a place later known as Carfax – probably meaning four forks, from the latin quadrifurcus. The oldest standing building, the Saxon tower of St Michael at the Northgate, was built in 1040
The Normans
The castle is Norman. After the death of the knight who built it, it was used by Royalty from time to time. The most notable of these visits was from Empress Matilda, who lived in the oldest surviving structure, the Tower of St. George, during the civil war known as the Anarchy. The Norman invasion was hard on the town. The Domesday book recorded that half of the town’s had been laid waste in 1086, but it also recorded the right of the town’s Freemen to graze animals in Port Meadow free of charge – a right still exercised today.
By the middle of the 11th Century Oxford was one of he more important provincial towns, on a par with Lincoln and and Winchester, and Royal councils were occasionally held in the town.
The University
There is no clear date for the foundation of the University, but there is evidence of teaching in 1096. It grew rapidly from 1167 when Henry II banned English students from attending the University of Paris. The city was well established as an academic centre by the 13th century with University, Balliol, and Merton Colleges all founded during that century.
Town and Gown
Academic life in Oxford was characterised by murder in the stories of ’90s TV detective Inspector Morse, and this violence in academia was foreshadowed by a turbulent relationship between Oxford’s town people and students. The most notorious incident occurred in 1354 in the Swyndlestock Tavern (a bank today), when two students took issue with the innkeeper about the quality of his wine. This dispute quickly escalated into an armed conflict that lasted three days and resulted in around 90 deaths. Despite incidents like this and regular scholastic riots, by the mid 14th century the University was well established enough for Edward III to pay tribute to it for both its contribution to learning and the services to the state of Oxford graduates. Several colleges were founded every century and there are now 39 in total.
Reversals
Oxford’s growth was inevitably accompanied by some reversals. In the 12th century a fire burned the city to the ground and the black death of the 14th century reduced the population heavily; as did the sweating sickness epidemic of the 16th century. The university benefited from these depopulations by buying up vacant property and continuing to grow its estates.
Arrival of Industry
In the late 18th century Oxford connected to Coventry and the Thames, and in the mid In 1844, the Great Western Railway linked Oxford with London. The city became more industrial when the automotive industry was established in nearby Cowley by William Morris, who built the Morris Garage in Longwall street in 1910. The need for more space bought a move to a factory 1913 at Cowley and mass production followed, resulting in Cowley expanding into a large industrial centre. Despite its canal and railway links, the city had remained a tight knit , conservative and academic town, with the the university press the only large-scale employer. The car industry transformed Oxford into one of the major industrial cities of southern England, though happily the architectural gems of the old city have been well preserved, also being spared the devastation meted out to so many other cities during World War II.
The sights of Oxford
As you might expect from such a historic city, there are numerous sights to be enjoyed in Oxford, which particularly photogenic, though it is often very crowded, especially in the summer. Here are my top ten:
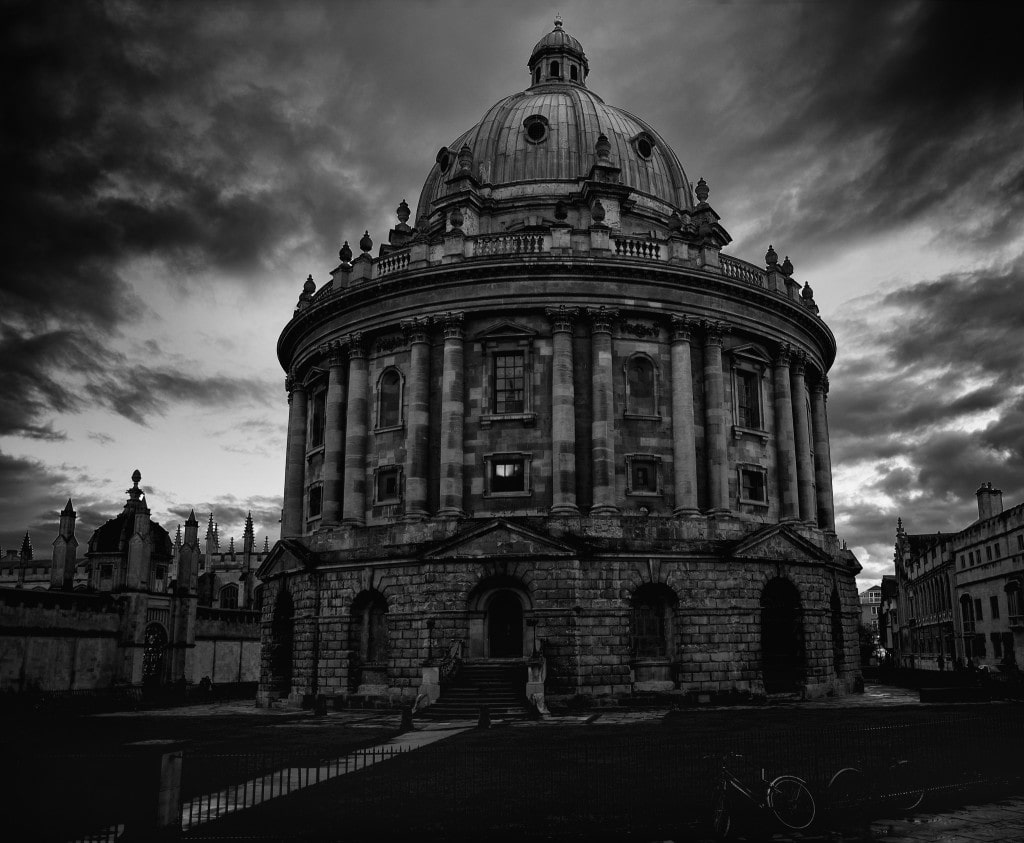
The cobbled Radcliffe Square containing the iconic Radcliffe Camera (part of the Bodleian Library), and surrounded by the ancient trio of Brasenose College, All Souls College and the University Church of St Mary the Virgin, with its excellent view from the top of the tower.
The old pubs of the city, including the Kings Arms (1607), near Radcliffe Square; the Eagle and Child, frequented by J. R. R. Tolkien and C. S. Lewis and located on St Giles; the old coaching inn of the Lamb and Flag, also on St Giles; the 13th century Turf Tavern, and the Bear, one of the oldest of all, with its wood panels and collection of 4,500 ties.
The Covered Market, which opened in 1774 and contains a fantastic selection of fresh produce, cafes and boutique stalls.
Bohemian Jericho, which contains Freud, one of the most notable cocktail bars in the city, located behind the ancient looking Greek columns of St Paul’s Church on Walton Street and the excellent Indian cuisine of the Standard, also on the same street.
The Sheldonian Theatre, designed by Christopher Wren for the University with its busts of the Philosophers or Emperors.
Christ Church Meadow which borders the Rivers Cherwell and Isis (the local name for the Thames) which is ideal for a stroll. The buildings of Oxford’s largest college are also very beautiful, though even busier now with visitors since the filming of the Harry Potter films. Alice’s Adventures in Wonderland were also inspired and written there. The Tom Tower is one of the most imposing sights – the upper part of the tower was which was designed by Sir Christopher Wren, who had himself been a student at the college.
The eclectic collection of the Pitt Rivers Museum, founded by Lieutenant-General Augustus Pitt Rivers, an anthropologist who collected more than 20,000 objects from around the British Empire.
The Ashmolean Museum of Art and Archaeology, on Beaumont Street, which was the world’s first university museum, and will content the culturally curious for several hours at a time.
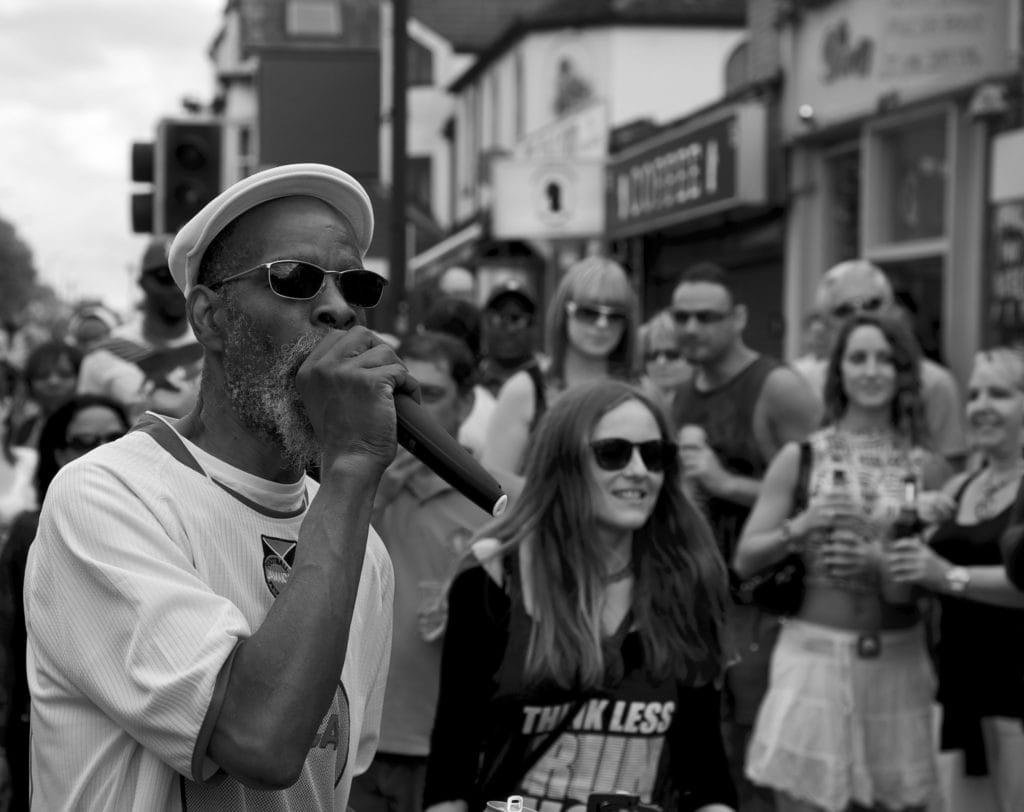
The ethnically diverse restaurants, shops and people of Cowley Road, with its annual carnival. This started in 2000 and now attracts crowds of up to 45,000 people, with live music and food stalls outside the many restaurants.
The ancient grazing land of Port Meadow and the nearby pub The Trout, located on the banks of the Thames.
I lived in Oxford in the late ’80s and early ’90s, moving up from Deal in Kent, my home town. Initially I rented a room in a crumbling gothic mansion in Norham Gardens, where I taught English to foreign students. It was post graduate house populated by academics including a semiotician, several mathematicians and a philosopher. I was asked to show my rather less distinguished Degree certificate to the landlady before I was able to move in. Later, as Academic Representative for a German language school, I lived in a damp basement flat in Iffley Road – which gave me the opportunity to get to know the nearby Cowley Road. During that time I came to be very fond of the City of Oxford and have lived in the county ever since.
I have been photographing the Radcliffe Camera for over 20 years, but the image included in this post is the first one I actually feel does it any justice. It was taken on a wet, cold evening in January 2014 when hardly anyone was around and the sky was full of drama. I took the shot with an old school 24mm ƒ/2.8D prime lens originally designed for film cameras mounted on a Nikon D600 (a troublesome body I intend to trade in for a D500 at some point). The Cowley Road Festival shot were both taken on a Nikon Df with an AF-S 24-120mm ƒ/4 lens.
Black and white images often possess a timeless quality that is more difficult to achieve with colour images. This is largely because colour provides more visual clues as to when a photograph was taken.
Variance in the colours themselves can sometimes suggest a specific era – the difference between the colour renditions of the 1970s for example, and today are often clearly discernible; this is due to differences in colour processing, which have changed significantly over time.
Printed colour images may also be subject to varying degrees of instability as they age, which is also helpful in dating them.
The Advance of Colour Film
The first permanent colour photograph was taken in the 1860s using the colour separation, a method which required shooting three separate black and white photos using three different coloured filters. These were then projected together to create a colour image.
By the first decade of the twentieth century colour separation using the Autochrome process which used millions of tiny colour filters made of potato starch spread over the surface of a plate of glass was available.
In the 1930s multi-layered colour film was developed, the first of which was Kodachrome. The 1960s saw the development of instant photographs by Polaroid, and in the 1970s the C-41 chromogenic colour negative process replaced the C-22 process that Kodak had introduced in the 1950s. For more on the history of photographic processes, see the article on this site ‘From Chemistry to Computation’
It was not until the 1970’s that colour photography became the form of photography. Monochrome photography continued but in niche markets such as fine art.
The Advent of Digital
With the advent of digital photography the clues provided by film have disappeared, but colour is also an element of fashion which inevitably gives a better sense of when the picture was taken. Regardless of changes in fashion, colour provides a level of detail absent from black and white pictures – there is just less information for us to process, making a picture more difficult to date. This is helpful in many genres of photography but is especially so for travel, street and portrait photography. Whilst we know the approximate date we took our pictures, if when these photos were taken is difficult to discern, it seems to imbue them with additional value. Why this should be a virtue is largely attributable to the notion of the ‘classic’ – something long-standing that does not date with age. Synonyms of the word classic give us a clue to the value implied by the term: simple, elegant, understated, uncluttered, restrained, time-honoured, timeless, ageless, abiding, enduring and immortal. Portrait photographer Anne Geddes made the point well when she said: “The best images are the ones that retain their strength and impact over the years, regardless of the number of times they are viewed.”
Photographing souls
Another aspect of timelessness, although more subjective, is that many photographers consider black and white photography promotes a stronger emotional connection with people. Canadian photographer Ted Grant’s quote on this is well known: “When you photograph people in color, you photograph their clothes. But when you photograph people in black and white, you photograph their souls!“
Souls being more durable and important than clothes (to all but the fashion industry!) this quality naturally creates a more timeless photograph.
The Weight of History
Another factor is that because black and white photography preceded colour, many of the pioneers of photography from Adams to Weston including many pioneering women, shot in black and white . Monochrome images were dominant beyond photography’s formative years – leading the way for the first 120 years or so of photography’s history. This resulted in a huge number of iconic black and white images and creates a significant pedigree and a degree of nostalgia for what is now a genre rather than a technology.
The accompanying photo is of Newcastle based photographer Irena Childers and was shot in Garth Park, Bicester, as part of a camera club shoot. It is a digital shot but it strikes me that the picture could have been taken at any time between from 1950 and the present day. This only became apparent when I performed the mono conversion with Silver Efex. The colour version just didn’t have the same timeless quality…
When a photograph is converted to mono and the colour removed, what remains is tone. Tone is in fact one of the reasons black and white photography has continued to be popular after the advent of colour. It was the tonal quality of Paul Strand’s work that inspired landscape legend Ansel Adams to make a career change from classical pianist/hobby photographer as a hobby to full time professional. It was the“full, luminous shadows and strong high values, in which subtle passages of tone were preserved” in Strand’s photography that Adam’s found so compelling.
Tonal Range
Tonal range refers to the range and distribution of tones in an image from the darkest to the lightest values. An image with a wide tonal range will include very dark (black) and very light (white) elements, whereas as one with a narrow tonal range will be limited to a more restricted area and will have less contrast. Lighting conditions have a great impact on tonal range. On a misty day in Oxford, UK the difference in brightness between the lightest part and the darkest parts of the scene will be relatively insignificant, but under the harsh light of the mid day sun in Arizona the range will be much greater. Extremes such as that aside, images with a wide tonal range tend have both greater contrast and greater appearance of drama and depth. A narrower tonal range makes the image look flatter, though this may be by design. Tonal range is influenced by the amount of and quality of light (harsh or soft) and the reflectance of the subject. The addition of a polarising filter, something I use extensively, improves contrast and can thus help expand the tonal range. Tonal range is different from dynamic range which refers to the ability of the camera’s sensor to capture shadow detail from the darkest values and highlight detail from the brightest values in the same shot. Dynamic range is maximised in RAW format which records all the image data the sensor is capable of recording, and is one of the main reasons this format is used. Tonal range is the number of tones an image has has to describe the dynamic range.
Tonal Contrast
Tonal contrast is created when light tones and dark tones are adjacent to one another – it has the effect of directing the viewers attention to the contrasting area and is the basis of the success of many black and white images. It is an essential element of composition, but is not as well known as other compositional rules such as leading lines, the rule of thirds, framing, and diagonals.
A tonal curve is typically applied to the image by the camera by default as the image data from the photo sites is linear (the values are directly proportional to the light received), whereas human vision is non-linear. The process is known as (tone curve correction aka gamma correction) and makes the pictures look right to the human eye on a screen display. This process generally lightens the midtones. This default tonal curve can be adjusted in the curves tool of RAW conversion programs (such as the ageing but excellent Aperture, which I still use). The Aperture user manual describes the use of the Curves tool quite well:
“You use the Curves adjustment controls when you want to manually set the tonal values of the shadows, midtones, and highlights in an image using a tonal curve. Unlike the Levels adjustment controls, the Curves controls do not reapportion the luminance values in the image by constraining the white and black points. Instead, you use the Curves controls to precisely remap the position of the midtones relative to the white and black points. Because the human eye’s perception of light is logarithmic rather than incremental, a curve is necessary to distribute the luminance values across all tonal ranges in an image in a way that matches how the eye perceives light in nature.”
Applying a Tone Curve
Applying an S-shaped curve to the data, which is initially shown as a straight line, applies a steep curve in the mid tones, which increases contrast and give the image greater impact. A correctly exposed film image has an inherently more S shaped tone curve than a digital image, and film, being based on a chemical process, and therefore essentially analogue, also creates a smoother continuum of tones than digital cameras. This difference diminishes with every generation of sensor. As much as I care about tone, the advantages of the digital dark room, for me at least, vastly outweigh any disadvantages of digital photography. Let’s take the example of dodging (applying reduced exposure locally) and burning (applying additional exposure locally), both of which are important techniques to modify tone. To quote Ansel Adams once again: “dodging and burning are steps to take care of mistakes God made in establishing tonal relationships.” Both are fiendishly difficult to master with film to the level Adams used, and far simpler with image editing programs such as PhotoShop. It is worth noting that some photographers also consider that dodging and burning can give a more natural impression than adjusting the tonal curve. I use both techniques.
The Black and White Advantage
Here are some of the advantages that the various attributes of tone confer over colour:
With only tones to work with, black and white forces the photographer to pay closer attention to composition – which is in itself an advantage.
The simplicity of a race of tones makes the subject easier to focus on, which is one of the reasons so many street photographers eschew colour.
Simplicity can be enhanced by discarding extraneous detail more easily in monochrome images. I often burn out distracting detail in dark areas to further simplify the image.
Editing a photo converted to black and white provides a much greater opportunity to redistribute the light to create finely graduated tones, which can make architecture and sculpture both more three dimensional and more beautiful.
In portraiture, skin tones are evened out.
Graphical elements and patterns are more evident.
Abstract images are stronger.
Textures often appear to have more depth.
Black and white photography is more effective in low contrast situations, such as under heavy cloud
My example of tone from Flash of Darkness is the Colossus of Constantine in the Courtyard of the Palazzo dei Conservatori of the Musei Capitolini (Capitoline Museums) on the Capitoline Hill in Rome. The statue, built c. 312-315 AD is truly immense and once stood at around 40 feet high. I have experimented with many different versions of this image, from low key to high key and with varying tone curves and application of dodge and burn. The image I prefer however is the one on this page which is fairly neutral, with only a slight increase in contrast; it seems to be the most effective at describing the shading of the marble forms and the subtle changes in the tones of the painted plasterwork.
We have had colour photography since the 1930s and the invention of Kodachrome, though it took until the 1970s for it become the norm. So why has black and white photography persisted?
Perhaps the most obvious difference between colour and b&w photography is that unlike their colour equivalents, black and white images are not direct renditions of their subjects. By omitting colour and substituting shades of grey, black and white photography presents an abstract and therefore less realistic image. This takes us into the representational world of art, where the artist tries to portray what is perceived and interpreted with the mind rather than what is seen directly by the eye. Both the artist and the photographer are working with a 3D subject in a 2D medium and this is where black and white photograph has an advantage over a colour rendition – black and white excels at tone; which describes the darkness or lightness of a particular area of an image. This is important as tone is essential to convey the illusion of form – or how the subject looks in three dimensions. Black and white draws more attention to the shadows and lines that depict form and gives a better illusion of depth. This is one of the reasons that black and white is often an effective medium for both landscapes and architectural shots as it can emphasise the shapes and forms within the scene. The case for black and white is even stronger with a side lit photo where light intensity varies across the person or object and the scene is subject to strong shadows. This is one of the reasons why I am fond of film noir which uses a lot of side lighting, shadow and contrast as opposed to the the more evenly exposed lighting of mainstream Hollywood.
On to my example, which is a shot of the columnar and iconic Marina City Towers on Chicago’s Riverfront, designed by architect Bertrand Goldberg. This is one of Chicago’s most notable buildings and was designated a city landmark in 2015. I was much taken with this 65-storey building complex, the tallest residential concrete building in the world at the time of completion in 1964, and known locally as the ‘corn cobs’, as I was driven to my hotel in a taxi. At the time I thought it was the world’s most elegant car park, but actually only the lower 19 floors are used for parking, whilst the upper floors contain apartments, restaurants and a concert hall. The towers were used as a back drop for a chase scene in Steve McQueen’s 1980 film ‘The Hunter’ . In his last film appearance, McQueen played a bounty hunter who is himself being pursued by a psychotic killer and chases a fugitive up the parking ramp in one of the towers before the car he is pursuing skids off the edge into the Chicago River.
I shot the towers from several locations, including the river, whilst on an architectural tour of the city, and eventually captured this image, which I felt depicted the organic form of the building best – the contrast between the light edges of the circular elements and the dark background, together with the sweeping curves of the tower in the foreground, draw the eye and help describe its form. It was shot in the morning, and, as usual, I used a circular polariser to darken the sky and increased the contrast between the building and its background. I took the shot with a Nikon Df with a ‘walk around’ 28-300 lens at ISO 200/45mm/f11/1/250 sec. The towers have a constantly changing pattern of light and shadow over the course of the day and are an ideal subject for black and white photography as well as a great piece of architecture. I was much taken with Chicago, which I visited for the first time in 2015 – it is undoubtedly one of the finest cities for modern architecture in the world and I am keen to return to capture more of it, but my enduring memory of my first visit is those iconic, sci-fi columns of Marina City.
I spent the first 18 years of my life in Walmer, the village that adjoins the town of Deal in Kent. When I was 18 all I wanted to do was to leave for the excitement of London, but by my thirties Deal had become my favourite place to return to. I brought my young family to Deal often and we rented a cottage in Nelson Street which is situated in the picturesque conservation area of the town. I’ve travelled extensively over the years but Deal remains my favourite place to visit and I visit as often as I can.
The Morning Haze on Deal Beach
A Port Without A Harbour
Deal, Kent is unique in once having been a port without a harbour. The anchorage known as The Downs located between the Deal shoreline and the Goodwin Sands provided shelter for ships in the channel, and Deal became a thriving port, later defended by several castles. It has a fascinating history, equally famed for heroism and villainy. Over time it has been a garrison town, a mining town and lately a thriving seaside resort. See the post on The Historic Town of Deal for more on this subject.
The Many Pleasures of Deal
There are many pleasures to be had whilst staying in Deal. Here are ten of my favourites things to do in the town, in no particular order:
A stroll along the broad promenade and then onto the pier (said to be the same length as the Titanic but actually 200 ft longer)
A walk through the winding narrow streets of the conversation area to admire the restored cottages and town houses, and perhaps to visit one of the fine old pubs like The Ship Inn, The Deal Hoy or the Royal Hotel.
Coffee or a bite to eat in the Black Douglas (run by the descendants of the Scottish knight)
Sitting out on the seafront in front of the picturesque Kings Arms
These are the most interesting quotes I found from artists, writers, film makers, journalists, designers, art-critics, actors and philosophers on the subject of photography. As with the photographers, I allowed myself only one quote for each. Same express pro-photography views, whilst others are decidedly opposed to the medium. Either way, they make interesting reading.
Brigitte Bardot – Actress, singer, fashion model & animal rights activist
“A photograph can be an instant of life captured for eternity that will never cease looking back at you.”
John Berger – Art critic, novelist, painter and poet
“What makes photography a strange invention is that its primary raw materials are light and time.”
“Taking photographs can assuage the itch for possession sparked by the beauty of a place; our anxiety over losing a precious scene can decline with every click of the shutter.”
William S. Burroughs – Novelist, satirist, essayist, painter, & spoken word performer
“There is in fact something obscene and sinister about photography, a desire to imprison, to incorporate, a sexual intensity of pursuit.”
These are some of the most interesting thoughts of photographers on photography, expressed as quotes. Some of them I agree with, some I don’t – but they are all thought provoking. I restricted myself to one quote per photographer, which in many cases, such as Ansel Adams and Henri Cartier-Bresson, was difficult. In the next post I will collect the thoughts of other creatives such as artists, film makers and writers on the same topic.
Ansel Adams – Landscape Photographer
“Dodging and burning are steps to take care of mistakes God made in establishing tonal relationships.”
William Albert Allard – Documentary Photographer
“What’s really important is to simplify. The work of most photographers would be improved immensely if they could do one thing: get rid of the extraneous. If you strive for simplicity, you are more likely to reach the viewer. ”
Diane Arbus – Documentary Photographer
“I tend to think of the act of photographing, generally speaking, as an adventure. My favourite thing is to go where I’ve never been.”
Richard Avedon – Fashion & Portrait Photographer
“A portrait is not a likeness. The moment an emotion or fact is transformed into a photograph it is no longer a fact but an opinion. There is no such thing as inaccuracy in a photograph. All photographs are accurate. None of them is the truth. ”
David Bailey – Fashion & Portrait Photographer
“It takes a lot of imagination to be a good photographer. You need less imagination to be a painter because you can invent things. But in photography everything is so ordinary; it takes a lot of looking before you learn to see the extraordinary.”
Margaret Bourke-White – Photojournalist & War photographer
“If anyone gets in my way when I’m making a picture, I become irrational. I’m never sure what I am going to do, or sometimes even aware of what I do – only that I want that picture.”
Brassai – Photographer, Sculptor, Writer & Film Maker
“Chance is always there. We all use it. The difference is a poor photographer meets chance one out of a hundred times and a good photographer meets chance all the time.”
Andri Cauldwell – Photographer
“To see in color is a delight for the eye but to see in black and white is a delight for the soul.”
I have seen some astonishing black and white photography that uses very strong neutral density (ND) filters such as the B+W ND 110 to blur cloud movement using a long exposure. I wanted to get some shots with the same effect into my portfolio. The B+W 110 is not for the faint hearted because it is so black the camera typically can’t meter or focus through it, but I’ve tried lesser NDs and they are just not strong enough for the full effect. The real full on long exposure effect can be stunning, and I obtained reasonably pleasing results on the shoot, so I’m going to keep going. The picture on the left is entitled ‘The Road to Nowhere’ and is a small road that runs just off the A41 between Aylesbury and Bicester towards Brill, where I also shot that day. After some experimentation I found the following to work quite well:
Ideally you should shoot on a cloudy day with strong winds so that you can capture the movement as a blur. The direction and speed of movement of the clouds is of interest as movement across the frame versus towards or away from you look quite different.
Set up your camera on a tripod. Make sure it is really secure, especially if you are in a high wind. If you have a strap attached to the camera make sure it is not flapping about. Ideally you should be using a cable release or remote to release the shutter.
Compose a test shot without the filter, in aperture priority mode – setting the desired aperture, which will typically be small (I mainly used f16). Typically you will want to set a low ISO, shoot using Raw and disable lens vibration reduction as it is not helpful on a tripod.
Focus using auto focus and take note of the shutter speed.
Next, screw in your B+W 110 10 stop neutral density filter, and switch to manual focus and manual mode.
In Manual mode set the shutter speed to 1000 times the shutter speed of the meter reading for the test shot, keeping the same aperture setting and using the bulb setting if necessary.
Take the shot and look at the result. Adjust the shutter setting as desired until you get the exposure you want.
Take off the ND filter, flip back to aperture mode and autofocus and take a bracket of 3 shots that can be used with the long exposure to create a properly exposed image.
The typical advice you will find on the web about combining Route 66 and Monument Valley on a trip is ‘don’t’, and I will admit that we (myself and two old friends) cranked out some substantial mileage in 8 days to accomplish this (2,232 miles in all, taking in Antelope Canyon and Death Valley for good measure). It was well worth it. Taking a large vehicle like a Chevy Suburban (in FBI black) helped. My gallery for the Route 66 shots is here. Our planning was sketchy, but here’s our itinerary:
London to Dallas/Fort Forth
Margaritas and dinner at Javier’s, Dallas, which is a fine establishment.
Morning in Dallas, visited the 6th Floor Museum, which is sombre but well worth the visit. None of us give much credence to conspiracy theories but all agreed something wasn’t right with the conventional story. 18 witnesses disappeared… Our taxi driver, Charlie Ratcliff, of Cowboy Cars (+1 214 284 9919) was a witness who didn’t disappear. He saw the shooting as a boy and can be seen in the Zapruder footage with his father. He gives tours of the city, though we were pressed for time and could not take him up on his offer.
Drove to Amarillo, Texas. Passed the leaning water tower at Groom, Texas (this is 1 of 2 things to see or do in Groom according to Trip Advisor). We had dinner at the Big Texan, a well known Route 66 waypoint. Kitsch does not do it justice, though the steak was a little disappointing given the hype. We were taken to and from our hotel in a battered town car with steer’s horns on the front. We avoided the 72 ounce steak challenge.
Headed back onto Route 66 and stopped at Tucumcari, New Mexico to take some shots and have a coffee at the Circa Espresso Bar.
Drove to Sante Fe, New Mexico. Our route took us through Gallup and stopped to see the El Rancho Hotel, another Route 66 waypoint. On arriving at the beautiful city of Santa Fe we sampled the fine beer and pizza on the balcony at the Draft Station with a view of the plaza. We stayed at the La Posada de Sante Fe, which is highly recommended. It is haunted though, apparently…
Drove to Monument Valley – we were all blown away by it. Breathtaking is an overused word but it is fair in this case. We stayed at Goulding’s Lodge, which nestles under the cliffs and has an old world charm. It is one of only two hotels in the valley. We enjoyed the local Navajo bread as part of dinner, but missed a beer as the reservation is dry.
Took a tour of the Loop Road, Monument Valley and saw the breathtaking John Ford’s Point – complete with a Navajo man on a horse on the point. He had been hired by a Japanese photography group. The shot is on the home page a couple of images in.
Drove to Antelope Canyon, a slot canyon near Page and took a photographic tour with Adventurous Tours. The canyon is absolutely stunning, though difficult to photograph because of the intense light and shade. Our guide was very knowledgable and this helped a great deal. Interestingly he had been into the canyon with Peter Lik, who shot the world’s most expensive photograph, The Phantom, there.
Drove to Flagstaff Arizona, which is great base to explore the Arizona section of Route 66 from. We stayed at the Little America Hotel and played Pool and Shuffleboard at Uptown Billiards before dinner at a good noodle bar, Sosoba.
The following morning we walked the Ponderosa Pine trail at the back of the hotel and saw – in addition to quite a lot of pine trees, various kinds of ‘critters’, none of which we could identify.
Headed to Williams, Arizona – my favourite town on Route 66. Stopped at the ridiculously named ‘Bearzonia’ on the way. The bears and wolves most impressive – especially an evil looking wolf we nicknamed ‘Evil Dick’. We met some great characters in the two Western outfitters in Williams and had a burger at the Cruiser Cafe.
Spectacular drive along Route 66 through the Black Mountains (listed on dangerous roads) to the Ghost Town of Oatman, where 100 or so people hang on in a place barely changed since the 1920s and wild burros wander the streets. We had a beer at Judy’s Saloon and wandered through the town – it is quite something to behold.
Drove to Las Vegas, Nevada. It’s not my favourite place, but it was on the way and we had a good dinner at Sushi Samba.
Headed out to Death Valley equipped with very little in the way of a plan or provisions – which is not advisable. Stopped at Furnace Creek and Zabriskie Point. We were all surprised by how beautiful the scenery was.
Arrived late at night in LA having skipped both lunch and dinner in the name of mileage.
A final breakfast of Eggs Benedict and saw a little more of old Route 66 on the way to LAX airport.
Hours in the car – around 40, photographic keepers about 30, fun – almost unlimited.
In 2014 I visited Cuba. I had been shooting with professional photographer Ramses Batista for several days in Old Havana when it occurred to me we should take a trip out of the city into the jungle in one of the old American 50s cars that still do service as taxis in that city. Over a beer we discussed this and Ramses, who is something of a fixer, knew a driver with an immaculate ’55 Chevy Bel Air. He suggested we took this out to Soroa, where there is a picturesque waterfall. En route we would stop at a former coffee plantation and later take in an abandoned villa out in the jungle. The next day our driver, Joe, pulled up outside my hotel with his gleaming wheels. It was immaculate and had been modified to hot-rod specification complete with a chrome skull on the end of the column change.
I declared it perfect. We set out and drove to abandoned coffee plantation. We parked the gleaming Chevy and set off on foot. Vulcher like birds circled above us as we took in the views of the valleys below us. As we walked I could hear the sound of distant drums and enquired where they might be coming from. Ramses pointed out some buildings far below us ‘It’s a kind of community’ he said. Voodoo, I thought, unreasonably. To be fair, my overactive imagination had been fueled by a couple on incidents during the trip.
The first had been a few day’s previously on a quest to shoot angels at Havana’s fine old cemetery (Cemetario de Colon). On the way out the boot of the car was searched by the man at the gate. ‘What is he looking for?’ I asked Ramses. ‘Human bones’ he replied. ‘There are old religions in Cuba, and some need special ingredients like animal blood and human bones. He’s just checking we didn’t take bones with us.’ A little bit of web research introduced me to read about Palo Monte, one of the darker of Cuba’s syncretic religions which uses these ingredients to enlist the help of deceased ancestors. The second was when I saw a tethered goat in the street in Old Havana. When I commented on it Ramses told me it was most likely a sacrificial animal. Given these two recent experiences I suppose it wasn’t entirely surprising the distant sound of drums in the jungle prompted me to think of voodoo.
As we walked Ramses pointed out some jungle fruit and explained how to eat it without ingesting any germs from the outer shell. I was skeptical but it proved to be delicious. Returning to the car we drove on towards Soroa and parked up near a jungle restaurant. The scene, was pretty bleak; a man sat in the remains of a house near an abandoned ’50s car. Walking away from us were two men wearing filthy vests and carrying machetes. ‘Don’t point your camera at anyone unless I tell you it’s OK’ said Ramses. I nodded, feeling that this was an entirely reasonable request.
Lunch was better than I expected, and after we had eaten we walked down a flight of twisting stone steps to see the waterfall. I hadn’t brought a tripod with me, so I couldn’t blur the water the way I wanted to, but it was still very picturesque. We journeyed on to the abandoned villa, which looked to be of relatively recent construction, though it was quickly falling into disrepair. The entrance proved to be a good spot to shoot the Chevy, though the cloud cover was becoming an unfavourably uniform white by that time of the afternoon.
Our last stop was a bar, a place so remote I was surprised it would ever attract custom. There was a little podium near the bar with the holy trinity of Cuban cocktails on it: the Mojito; the Daiquiri and the Cuba Libre. Given the heat and humidity we opted for cold beers, which were very welcome. We returned late in afternoon and followed our normal ritual of a review of my shots over another beer with a commentary from Ramses, which I always found helpful.
Cuba is an incredibly vibrant country, but in 2014 I did feel an almost post-apocalyptic vibe about the place. Scarity has created a culture of ingenious and almost endless recycling, particularly with vehicles, that, with the benefit of replacement engines and transmission, go on almost indefinately. Things are changing now in Cuba, and hopefully for the better, but I am keen to get back before it loses that extraordinary look that is the result of all that ingenious recycling.
The Chrysler Building in New York is a favourite of mine, and a great subject for black and white photography. The metallic exterior, the sunburst on the crown and the metal eagles make it an architectural wonder for me.
The Chrysler is a reflection of both the Art Deco era and the machine age and has strong automotive accents. at 319 m, it was was briefly the world’s tallest building before that honour passed to the Empire State Building in 1931. It was the headquarters of the Chrysler Corporation from 1930 until the mid-1950s and is still the tallest brick building in the world, albeit with a steel frame, and the 5th tallest building in New York. The corners of the 61st floor are decorated with those fabulous metal eagles whilst replicas of the 1920s Chrysler bonnet ornaments (aka radiator caps) adorn the corners of the 31st floor.
I took the shot you can see here on a Nikon D300 with an 18-200mm lens at 112mm. It was shot from 42nd Street in New York City at ground level and the picture was taken in broad daylight, in the early afternoon. This statement sometimes results in disbelief, but at night what is most visible of the crown of the building is the triangular illuminated windows, so the building appears quite unlike my picture. A quick search on Google Images for ‘Chrysler Building at night’ will confirm the difference. The effect you can see here, which I refer to as ‘Darkness at Noon’ relies on a good quality circular polariser, the nature of the camera’s light meter, and an underexposure/red filter combination during mono coversion. Let me break this down step by step.
A circular polariser is an indispensible piece of kit that increases color saturation and decrease reflections. It is also one of the only lens filters the effect of which cannot be replicated by editing. Importantly, it can also darken skies, which is what I was using one for in this instance. I used a Hoya Pro-1, which does the job very well.
The second part of the equation is not a technique but a property of the camera, whose reflective light meter wants to average out every scene to middle grey. What this means in practice is that the brighter the subject (building) is, the darker the background (sky) will be. This is why the sky looks dark blue in many Mediterranean holiday photos – the white buildings darken the sky. I took a lot of shots of the Chrysler (around 50) and one in particular had a brighter building and a darker sky, as it had caught the sunlight particularly well at that moment. So, I took the best shot I had, in which the sky was already dark blue – helped along by the circular polariser – and did my raw editing in Aperture, adjusting the curves into a gentle ‘S’ shape to make the image more punchy.
From there I moved on to Photoshop, to perform the mono conversion. I use the Silver Efex Pro plugin, which is an amazing bit of software – it has a powerful set of options but also a rich variety of presets, which makes it easy to use. I selected the ‘underexpose’ preset and added the red filter, which together will turn a dark sky pitch black, and the image was complete: a silver building on a black background. Or perhaps, a silver building caught in a flash of darkness…
Old Havana is everything it is reputed to be and more. Travelling to the city from the airport on back roads, it felt like I had travelled into an era 50 years on from the apocalypse – with everything in a state of decay and recycling a major part of life. Old Havana, with its faded and crumbling colonial architecture and many ’50s American cars, is more of the same, and the feeling of being somewhere utterly different is reinforced by the suffocating heat, the noise and the slightly intimidating street life.
I spent five days with Ramses Batista – www.ramseshb.com, a professional Cuban photographer. We shot mainly on the streets of the city, but also drove around other parts of Havana and out to Cojimar and Soroa in Pinar del Rio. Ramses was a wonderful tutor and compañero and I was really happy with the shots I brought back with me. We spent a lot of time setting up street shots – something Ramses excels at. One of my favourites is shown here – Ramses told me about the Che mural, which was just around the corner from my hotel, the excellent Saratoga, and we flagged down a suitable vehicle for the shot – which shows the driver walking back to his car. I’ve used a lot of contrast and brought out as much of the structure of the road, building and car as I could. The mono conversion plugin Silver Effex allows the placement of selective control points, which can be used like spot lights, so I lit the wheels and the pillar slightly as as they were a little too dark without a bit of extra lighting. As to what the white substance on the road is, I have no idea, but it all adds to the tone and texture.
I’ll describe one anecdote from the trip that highlights how different Cuba is: Ramses and I went out to Colon cemetery to shoot Angels (entities which are well represented on this site at the angels gallery). As we drove towards the gates on our way out a security guard stopped us and searched the boot. I asked Ramses why this was necessary and he told me that the guard was searching for human bones, which are much prized for use in ceremonies in some of the syncretic religions of Cuba…
My Nikon D600 was reliable but suffers from a sensor that is astonishingly sensitive to moisture and dirt, so I spent a lot of time cleaning up spots from the images whilst editing them. I also took a trip over to my friends at T4 Cameras in Witney for yet another sensor clean. I was in similarly poor shape as I managed to put my back out travelling in the jungle in some rather dilapidated car seats (I felt we had to take a 50s car for the trip) and I picked up a nasty bug from the same locale – but it was most definitely worth it. I want to go back and see the rest of the island as soon as I can.
This is the oldest picture on this website and the beginning of my black and white photography journey.
It was taken on 110 film in 1987 and originally shot in colour.
The mono conversion came about because a friend at work was attending a photography class and was asking around for pictures he could use.
I had recently visited Ávila whilst in Madrid, staying with friend who had moved out there. This shot of the walls was the best I could find. I was amazed by what he did with it. He cropped it, converted it to monochrome and added some additional grain. At the time I just took snapshots, so this was a revelation to me. I consider this my first decent picture and my first step into black and white photography – a medium I have come to love. I still like the image; the absence of anything else in frame, the brooding sky, the way the walls stretch off into the distance and, of course, the subject itself, the mighty, pristine walls, are what make the picture work.
Ávila, the ‘City of Saints and Stones, was founded in the 11th century to protect the Spanish territories from the Moors. It is the capital of the province of the same name in Castile and León in North West Spain, 110 km from Madrid and separated from the capital by the Guadarrama mountain chains. It is 74 km from Segovia. At 1,126 meters above sea level, it is the highest provincial capital in Spain and sits on the top of a rocky outcrop in the midst of a barren, stone covered plain.
The medieval walls were built between the 11th-14th centuries and are astonishingly well preserved and the most complete fortifications in Spain. They stretch for 2.5km, stand an average of 12 metres in height, enclose area is 31 hectares (77 acres) and have 9 gates. The Old Town of Ávila has been designated a World Heritage Site by UNESCO, largely due to the walls which are its most impressive monument but also for its 12th Century cathedral and Romanesque churches. I want to go back and shoot Ávila at night, as it is beautifully illuminated – apparently it is the largest fully illuminated monument in the world.
 Origins
 Inspiration
 Q Results
 It’s been a while…
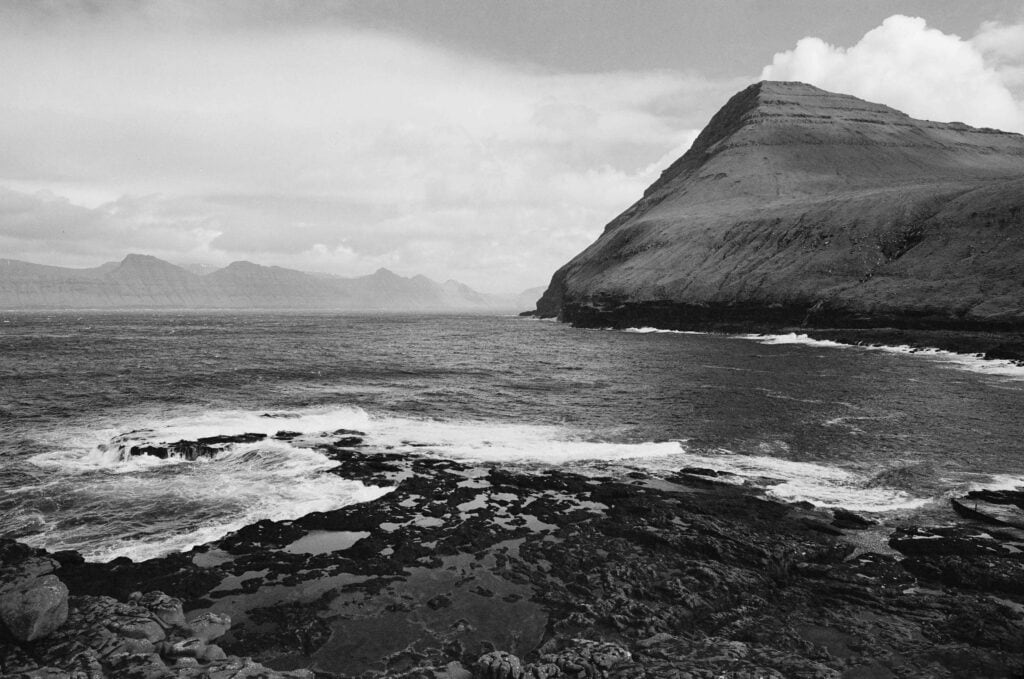
 The cobbled Radcliffe Square containing the iconic

 We have had colour photography since the 1930s and the invention of
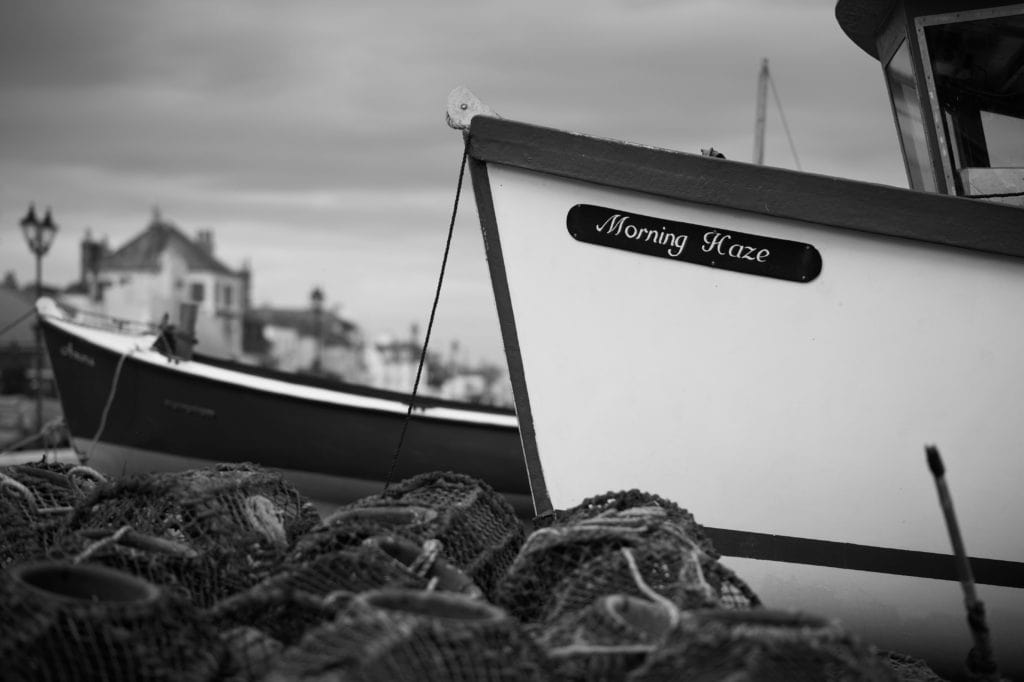
 I have seen some astonishing black and white photography that uses very strong neutral density (ND) filters such as the
  The typical advice you will find on the web about combining Route 66 and Monument Valley on a trip is ‘don’t’, and I will admit that we (myself and two old friends) cranked out some substantial mileage in 8 days to accomplish this (2,232 miles in all, taking in Antelope Canyon and Death Valley for good measure). It was well worth it. Taking a large vehicle like a Chevy Suburban (in FBI black) helped. My gallery for the Route 66 shots is
  In 2014 I visited Cuba. I had been shooting with professional photographer Ramses Batista for several days in
  The Chrysler Building in New York is a favourite of mine, and a great subject for black and white photography. The metallic exterior, the sunburst on the crown and the metal eagles make it an architectural wonder for me.
 Old Havana is everything it is reputed to be and more. Travelling to the city from the airport on back roads, it felt like I had travelled into an era 50 years on from the apocalypse – with everything in a state of decay and recycling a major part of life. Old Havana, with its faded and crumbling colonial architecture and many ’50s American cars, is more of the same, and the feeling of being somewhere utterly different is reinforced by the suffocating heat, the noise and the slightly intimidating street life.
 This is the oldest picture on this website and the beginning of my black and white photography journey.