Nearly three years after I first posted about my new Leica Q on this site, it was stolen from a South Kensington Pub. This was after a visit to the Natural History Museum to see the 2019 Wildlife Photographer of the Year Exhibition. I am fairly sure it was a professional thief, rather than an opportunist, who stole it as the camera was right next to me in its bag and our table was never unattended – yet we saw nothing. As the pub had no CCTV the police soon closed the case. Happily the camera was insured, and I was able to replace it.
Always on the Move…
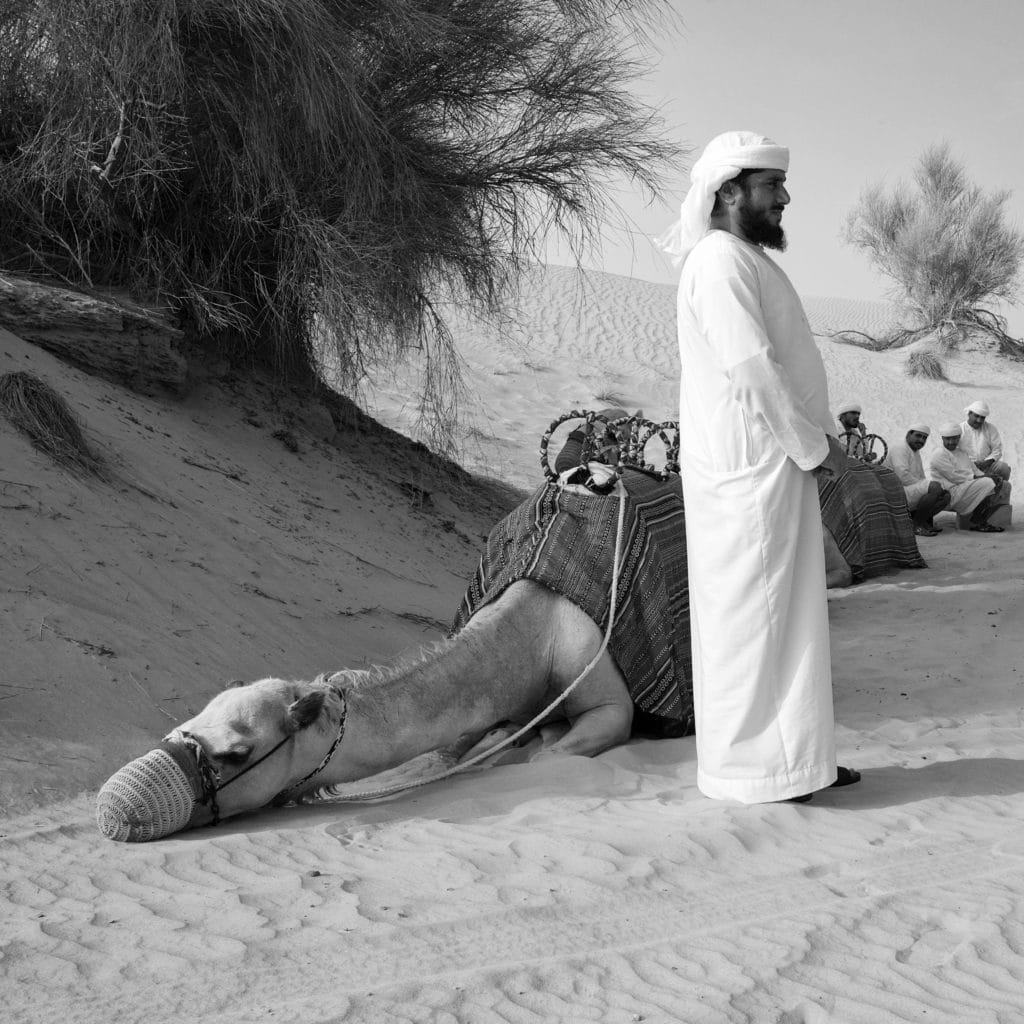
The Empty Quarter, UAE
2016-2018 were big travel years for me as my work took me to the US, Europe, the Middle East, Africa and, for a short while, the Far East. I also went on a couple of road trips – one from Canada to Mexico, and another across Japan. I was rarely at home during those years and I took my Leica Q everywhere I went. I took around 25,000 shots along the way and came to love my camera; it took everything the world could throw at it, whilst remaining perfectly usable, was a joy to handle and allowed me to create some of my best images. In this post I’ll share what I learned along the way.
Lessons Learned
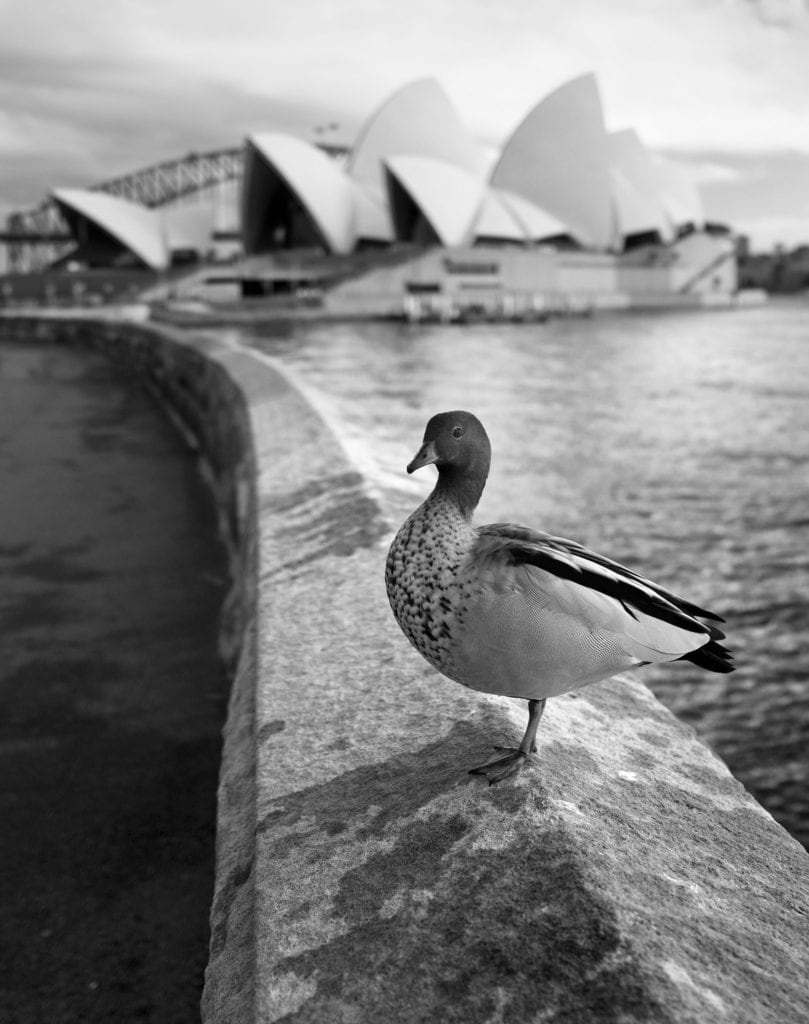
Firstly, the Leica Q is extremely tough and resilient . When I changed straps from the elegant, but thin, leather strap that came with the Q to my preferred, and wider, M strap I didn’t attach it correctly. It later came unfastened – just as I was about to shoot the Sydney Opera House. It hit the ground hard but fortunately had only a small ding on the top plate to show for it. Many other cameras would have been rendered unusable by the impact, if not damaged beyond repair.
This shot was taken just after my Leica Q hit the ground with some force.
The reason the Q survived the impact so well is because the top plate is machined from a solid block of aluminium that sits atop a tank -like body of magnesium alloy. For travellers there is just no substitute for a resilient camera – knocks are inevitable over time.
It’s worth mentioning that there is a knack to putting the strap on correctly to avoid testing the Q’s build quality the way I did. The easiest way is to take the metal fastener off the strap, put it on the camera first and then attach the strap. It’s actually pretty hard to get it wrong if you do it that way.
For a camera that lacks weather proofing it does very well in harsh conditions. Eventually the sensor needed cleaning, but that was after two years of shooting in some hostile climates including a couple of visits to one of the most inhospitable – the Rub al Khali desert, otherwise known as the Empty Quarter.
The Summilux f1.7 stabilised lens is unparalleled for sharpness. It’s the best lens I have ever owned, works incredibly well with the full frame sensor and of course delivers the recognisable but difficult to define Leica look. It is an aspherical (ASPH) lens, a design that tends to be more compact, sharper in the corners wide open and offers a bit more contrast.
I also found Leica’s choice of 28mm for a fixed lens to be a good one. 28mm is wide enough for landscape and urban work and you can easily crop in a little for street photography.
Shooting with the Leica Q is enjoyable and intuitive. The Q combines minimalist manual controls with modern electronic assistance to create a first class user experience.
After service is incredible. When I had the sensor cleaned (which was free of charge) Leica service replaced the chequered outer covering of the camera as part of the service!
It is worth considering both the hand grip and the Match Technical Thumbs Up for improved ergonomics. I prefer the Thumbs Up both in terms of handling and because the hand grip needs to be removed to change the battery or a memory card. It comes off quickly, but it will still slow you down a little. I use the Thumbs Up EP-SQ2 which is machined from solid brass and locks onto the hot-shoe with a hex key. It is pricey, but worth it as it is beautifully made. Once the Thumbs Up is on the camera it really does feel like it was always there and part of the original product.
When I got my replacement camera I was reminded of just how excellent the packaging is. The ‘chest of drawers’ that contains the camera, its accessories (all in their own little Leica bags) and documentation is really well designed. Just search YouTube for Leica Q unboxing to see how many people have been enthralled by the experience.
Despite its relatively small size it is a camera that attracts attention – good and bad. I keep the famous red dot logo covered, but Leica cognoscenti still comment favourably on my choice of camera from time to time. This is particularly the case in Deal, Kent where my parents live, and where I often visit. It seems there is a high concentration of Leica users there…
Beyond Caravaggiowas the name of a Caravaggio inspired exhibition at the National Gallery exhibition in 2016 that examined the influence of one of art’s true originals, Michelangelo Merisi da Caravaggio (1571-1610). Whilst the exhibition focused on his influence via the Caravaggisti and later painters, Caravaggio’s influence reaches well into to the present day; his use of everyday subjects and of dramatic lighting are cited as an influence on directors like Scorsese and Tarantino, photographers such as Nan Goldin and David LaChapelle and contemporary artists like Jenny Saville and Mat Collishaw.
For me, Caravaggio is a source of inspiration, directly through his work and indirectly through those he has influenced. One of the most important to me of those he has he influenced is Cindy Sherman, who is the subject of another exhibition inspired article on this site: Cindy Sherman – Star of the Films That Never Were. Sherman much admired Caravaggio’s ability to convey psychological depth in his subjects. She felt that “the interplay of light and shadow in his paintings resonates with the complex layers of identity that I seek to explore in my photographs.”
A Real Baroque and Roller
Caravaggio lived a short, turbulent life that was celebrated and notorious in equal measure. He was orphaned to the plague as a boy of six. At 11 he apprenticed in Milan but left in haste after wounding a police officer. At 21 he moved to Rome and gained fame with the success of his first public commissions, but he was regularly in court and jailed on several occasions. He was known for his drinking and whoring as well his brawling. His powerful supporters helped smooth things over with the authorities but there was only so much they could do to contain a man overflowing with violence. According to the German art historian Joachim von Sandrart (1606–88) Caravaggio spend his time in Rome “in the company of his young friends, mostly brash, swaggering fellows—painters and swordsmen—who lived by the motto nec spe, nec metu, ‘without hope, without fear.’” He was, as Time Out once noted, a real Baroque and Roller.
In 1606 he had a death sentence pronounced against him by the Pope after he killed a well known pimp in a knife fight. He spent the rest of his life on the run in fear of his life in Malta, Naples and Sicily. He slept in this clothes and always had his dagger to hand. His art, unsurprisingly, became darker and he was horribly mutilated by his enemies when they caught up with him in Naples in 1609. It is likely that they inflicted a sfregio (facial wound), as a visible sign of revenge. He died, still on the run, in 1610 aged 38.
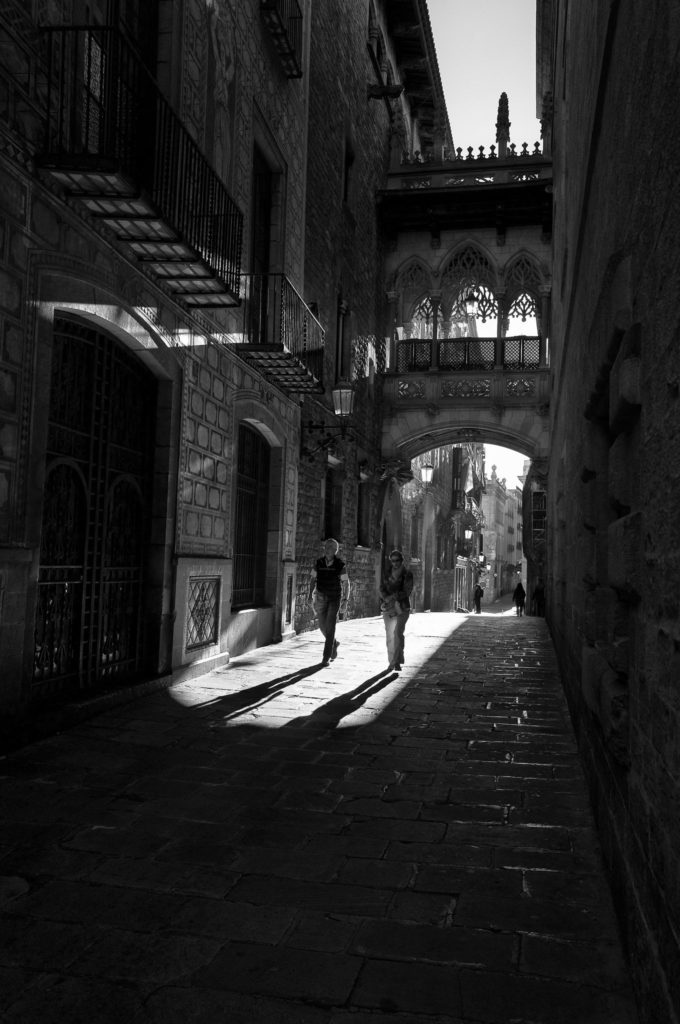
Extreme Chiaroscuro
Strongly contrasting light in Barcelona
Caravaggio’s technique is both distinctive and innovative. He is most famous for his dramatic use of light, an extreme variant of chiaroscuro, using dark shadows to produce strong contrasts between light and dark with an incredible tonal range. With this he captured form and added drama to his scenes in a way that no one before him had accomplished. The scenes he painted were spot lit from above; he once had a run in with a landlord for breaking a ceiling to let in light. It is so modern looking that David Hockney has referred to it as ‘Hollywood lighting’. There are claims by Italian researchers that his chiaroscuro is based on a form of photographic technique – the suggestion is that Caravaggio projecting the image of his subjects onto canvas using a lens and mirror and that he treated the canvas with a light-sensitive substance made from crushed fireflies, in order to fix the image. This hypothesis remains unproven.
A new kind of naturalism
Caravaggio combined dramatic lighting with a new kind of naturalism – painting people from the streets directly from life, and with incredible levels of often dirty hyper-realism created without drawing beforehand. He populated biblical scenes with prostitutes, beggars and thieves, bringing the sacred and the gutter together as he did so and polarising opinion. He also applied the same level of detail and realism to objects as to the people in his paintings. Great emphasis can be seen in the still life on the table in front of Christ at the ‘The Supper at Emmaus’ (1601), for example. It was this combination of dramatic lighting and realism that created the dramatic pictorial and narrative power he became renowned for.
My Favourite Caravaggio
The Taking of Christ is my favourite work by Michelangelo Merisi da Caravaggio . Painted at the height of his fame, The Taking of Christ is a high contrast, dramatic treatment of the biblical story of betrayal. It is set in the dark space of the garden of Gethsemane, lit by the moon and by a lantern held by a figure who peers in from the edge of the scene. This is Caravaggio himself. The painting offers a flash bulb moment of three soldiers in black contemporary armour, their faces largely hidden, who have come with Judas to seize Christ – one of them grasping his throat with a mailed fist. The brutality of the soldiers is in contrast with the calm and meek Christ, who offers no resistance, whilst St. John the Evangelist flees in anguish. It is dense, mysterious and incredibly dramatic.
Favourites From His Followers
The London Beyond Caravaggio exhibition offered many delights from the Caravaggisti and later followers, but two works stood out for me. The first was Christ displaying his Wounds by Giovanni Antonio Galli (nicknamed Lo Spadarino because his father was a sword smith). This painting is as hyper real is it is strange. A pale Jesus, lit by light that appears to come from nowhere, and naked except for his shroud, holds the wound on this side apart with hands holed by nails. He makes direct eye contact with us with an expression that is full of accusation.
The second is the The Martyrdom of Saint Bartholomew by Jusepe de Ribera. Saint Bartholomew’s executioner sharpens his knife in preparation of the flaying his about to perform – the knife and steel forming a symbolic cross. Bartholomew stretches out his arms to heaven, creating a powerful diagonal, his face lit by grace as well as light. The executioner’s expression is inscrutable, which makes the painting more disturbing.
Caravaggio’s Influence on Photography
Caravaggio’s influence on photography is evident in the works of photographers who sought to capture the same sense of drama and realism seen in his paintings. Another photographer I admire, Bill Brandt, known for the drama black-and-white images, acknowledged Caravaggio’s impact on his work, describing his use of light and shadow as “a revelation.” I feel exactly the same way.
Caravaggio’s influence on photography is not limited to his technique; his illumination of the gritty realities of life influenced photographers like Diane Arbus and Nan Goldin, who sought to capture the raw and unfiltered aspects of how we live.
Caravaggio and Film
Those who make moving pictures have also found inspiration in Caravaggio’s work. Filmmakers such as Martin Scorsese and Quentin Tarantino have both acknowledged Caravaggio’s influence. Scorsese, in particular, has frequently cited the painter’s use of light and shadow as a significant influence on his cinematography, saying, “Caravaggio’s paintings have a cinematic quality; they tell a story through visuals, and I’ve always been drawn to that narrative power.”
Caravaggio’s influence is not confined to directors; production designers and cinematographers also draw inspiration from his compositions. The interplay between light and shadow in Caravaggio’s paintings finds its counterpart in the carefully crafted lighting of films, creating a visual language that conveys emotion and enhances the story.
Caravaggio Around The World
Caravaggio’s masterpieces are dispersed throughout the world’s most renowned art institutions. Here’s a short list, including some the names of the most notable works: The Uffizi Gallery, Florence, Italy (Medusa); The Vatican Museums Pinacoteca, Vatican City (The Supper at Emmaus); The Borghese Gallery, Rome (David with the Head of Goliath); The Louvre, Paris (Death of the Virgin); The National Gallery, London (Supper at Emmaus – another version); The Metropolitan Museum, New York (The Musicians) and The Hermitage Museum, St. Petersburg (Judith Beheading Holofernes). I’d like to see them all.
The recent exhibition Fox Talbot: Dawn of the Photograph at the Science Museum in London which ended on September 11th 2016 was described as ‘magical to behold’ by Time Outand ‘ground-breaking’ by The Times. I found it extremely enjoyable as it told the story of the pioneers of early photography very capably as well as displaying a great body of their work.
Central to the story of early photography is William Henry Fox Talbot, who was born in February 1800. He attended Cambridge University in 1817 and went onto become a gentleman scientist, inventor, Egyptologist, member of parliament, mathematician, astronomer, archaeologist and transcriber of Chaldean cuneiform texts as well as a pioneer of photography.
It was a struggle with his sketchbook that put him on the road to photography: in 1833 at Lake Como in Italy, he found it difficult to capture the scenery adequately by sketching it with the aid of a Camera Lucida (an instrument used by draftsmen at the time which uses a prism to direct rays of light onto paper producing an image and from which a drawing can be made.) This started him on the journey of discovery with light-sensitive paper to automate the process that he was to pursue at his home in Lacock Abbey in Wiltshire.
Science, silver and sunlight
Investigations with silver nitrate and sunlight actually go back as far as Angelo Sala (1576-1637). Johann Heinrich Schulze (1687-1744) was the first to create photograms (a process that does not require a camera) with paper masks and Talbot would have been well aware of the work of Thomas Wedgwood (1771-1805) and Sir Humphry Davy (1778-1829) who also worked on photograms of leaves and other objects. These could not adequately fixed and faded quickly. Talbot built on this work, experimenting with plants and lace on paper coated with silver nitrate and fixing the images with salt to produce sciagraphs – drawings of shadows.
Talbot created the first negative in 1835, which minimized exposure time considerably compared to previous methods. He had help from his friend Sir John Herschel (1792-1871), one of the leading British scientists of the time, and another formidable polymath, who was an astronomer, mathematician, chemist, inventor and experimental photographer. It was Herschel who solved the problem of ‘fixing’ pictures (used by both Talbot and Daguerre) and was also the first to use the terms ‘photography’ and ‘negative’.
Inventors and pioneers
There is some debate as to is the inventor of photography or even who was the most influential of the pioneers. France can claim Nicéphore Niépce (1765-1833), inventor of a process known as heliography, who used a Camera Obscura to record an image of his country estate in 1826 via an eight-hour exposure. Better known is Louis-Jacques-Mandé Daguerre, (1787-1851), a former architect and artist who collaborated with Niépce, and who had used the Camera Obscura to assist with his paintings in his earlier career. He developed the Daguerrotype process after Niépce‘s death – a process based on light-sensitive, silver-plated copper, unique in the family of photographic process, in that the image is produced on metal directly without an intervening negative. Hippolyte Bayard (1801-1887) also holds a claim as the developer of the direct positive process and the first in the world to hold a photo exhibition. Bayard’s story embodies the struggle for recognition and adds a human dimension in the midst of all the science on show at the museum. It also serves up one of the most interesting images of the exhibition. Bayard was persuaded to postpone announcing his new positive process to the French Academy of Sciences by a friend of Daguerre, which cost him the recognition he deserved, and led him to create the first staged (or faked) photograph entitled, Self Portrait as a Drowned Man, which was on show at the Science Museum exhibition. The image portrays the photographer as a corpse, and M. Bayard wrote a fake suicide note on the back:
“The corpse which you see here is that of M. Bayard, inventor of the process that has just been shown to you. As far as I know this indefatigable experimenter has been occupied for about three years with his discovery. The Government which has been only too generous to Monsieur Daguerre, has said it can do nothing for Monsieur Bayard, and the poor wretch has drowned himself. Oh the vagaries of human life….! … He has been at the morgue for several days, and no-one has recognised or claimed him. Ladies and gentlemen, you’d better pass along for fear of offending your sense of smell, for as you can observe, the face and hands of the gentleman are beginning to decay.”
Before I went back to film with a Nikon F3 in 2016, my previous film camera was a Canon IXUS, from the late ’90s – a point and shoot compact which took APS film. My photos from that time date from before I actively studied photography and the shots aren’t the best. My APS films were developed on standard machines, not the specialist ones they had been designed for, which further compromised the results. So my journey with film photography journey really started with the Nikon F3..
A Fortunate Find
Whilst staying with friends in Stockholm in 2016, I came across an Aladdin’s cave of a camera shop, which had a number of film cameras for sale, including Kodak Instamatics, Rolleiflex TLRs and Nikon SLRs, including several Nikon F3 models, some fitted with external motor drives.
The Nikon F3 model I picked out showed signs of wear and had a hole in the bottom of the body (which I later discovered was due to a missing motor drive coupling cover) but I was quite taken with it and bought it on impulse.
An Early Model
This was my first Nikon film SLR. A bit of research revealed that the F3, the successor to the legendary Nikon F (also reviewed on this site) and F2, was the last of the manual-focus, pro 35mm SLR cameras. It was introduced in 1980 and stayed in production until 2001, despite being superseded by the autofocus F4 in 1988.
That’s a long run – especially as according to the MIR site, work on the F3 started back in 1974, barely three years after the debut of the Nikon F2! The formal design process started in 1977 and a prototype was ready by late 1978, which is when NASA came knocking for an automatic exposure control camera for the Space Shuttle.
A check on the serial number showed my F3 was an early model from 1981, not the more common HP (High Eyepoint) variant introduced in 1982. The HP model is identical to its predecessor except for the finder (DE-3), which allowed those wearing glasses a better view of the entire frame. This became standard on the F3, which became known as the F3HP.
Finder Tradeofs
I don’t wear glasses when shooting, preferring to use a diopter, and in this case that’s an advantage, as the trade off the HP model makes to make the whole viewfinder visible from slightly further back is fractionally lower magnification. The F3 is also slightly lighter than the HP variant as the finder HP finder weighs a little more, though the HP finder has slightly improved rubber sealing. Unless you wear glasses, there isn’t much in it.
Five Finders
The F3 has five finders (all interchangeable) to choose from: eye-level (DE-2), eye-level HP (DE-3) waist-level (DW-3), sport (DA-2), and high-magnification (DW-4). The F3 also offered a right-angle viewing attachment (DR-3) and an Eyepiece Magnifier (DG-2). I’ve stuck with the DE-2 my F3 came with.
F3 Exotics
Beyond models based on finder variants there are several more exotic models of the F3. The best known, is the F3/T titanium model, which not much lighter than the regular F3 but quite desirable.
There was also a ruggedised F3P Press/Professional model, the F3 AF autofocus model and the weighty F3H F3 High Speed, a motorised speed demon that could shoot at 13 frames per second.
The autofocus Nikon F3 AF, which became available in 1983 with 2 autofocus lenses, was Nikon’s first entry in the world of AF technology. The Nikon F-501 arrived in 1986, and the Nikon F4 in 1988.
The F3 Electronics Controversy
Unlike its predecessors, which had always been entirely mechanical, the F3 uses an electronically controlled shutter which requires batteries. Electronic shutters and dependence on battery power for anything more than a light meter was initially resisted amongst Nikon professional shooters. Their initial response was to remain loyal to their fully mechanical F2s and eschew the F3.
This controversy apparently continued for years and may still continue. As one blogger wryly commented as recently as 2019: “I mean, what could possibly go wrong in attempting a dispassionate, objective analysis of two excellent SLRs made by Nikon? Oh…right…we are dealing with two groups of people: 1) those that believe that the SLR reached perfection in 1971 and everything since is an abomination against the laws of nature, aka “Knights of the Order of F2″ (referred to henceforth as KOTOOF2), and 2) everyone else.”
The fears of Nikon pros at launch turned out to be unfounded as the F3 was demonstrated itself to be just as bulletproof as as the F and F2. Nikon was committed to increasing reliability – as an example the F3’s shutter was designed to last an incredible 150K actuations, increased from 100K for the F and F2. However, to give photographers more confidence in the new technology Nikon built in a backup mechanical shutter into the F3 that operates at 1/60 sec.
In practice, the F3’s batteries last a very long time (compared to my Leica M6 TTL for example) and the tiny LR44s are easy to carry as spares. I also have an F2 with a Photomic head, and it is excellent, but my F3 gets used more.
The F3’s Horizontal Shutter
Another issue that the professionals weren’t keen on was the slow flash sync speed. The F3 has a horizontal travel shutter which, given the 3:2 aspect ratio of film, takes longer to operate than a vertical travel shutter. The 1/80 second maximum sync speed was the same as that of the F2, but well below the semi pro models (FA, FM2, FE2) with vertical travel shutters, which offered 1/250 second. The F3 was the last of the Nikon Pro cameras with a horizontal shutter – the F4’s went the other way.
Longevity versus Mechanical Cameras
Over time electronic components can be the Achilles heel of older film cameras and initially I thought the Nikon F3’s LCD which displays the shutter speed might be a weak spot. The display in the viewfinder, the Aperture Direct Readout (ADR), is just a display window so is not subject to deterioration, but LCDs don’t always age well. They can become harder to read over time and eventually stop working entirely. Nikon predicted they would only last about seven years or so with pro usage! 35 years after leaving the factory my well used F3’s LCD is holding up perfectly well. The F3’s manual controls also mean that the camera can still be used without the LCD display, although not with automation.
The last point to consider in the electronic vs mechanical Nikon stakes are that electronic shutters usually maintain their accuracy over time better than mechanical shutters.
F3 Surprises
One surprise to me about the F3 was that it was styled by an Italian design legend: Giorgetto Giugiaro, the man who styled the Ferrari 250 GT Bertone, the Aston Martin DB4 GT Bertone, and much else.
Another surprise was that there were Space Shuttle versions of the F3. These had large magazine backs of different capacities and various other modifications for use in space. It wasn’t the first Nikon in space however, as modified Fs were used aboard Apollo 15 and Skylab.
Upgrades and Repairs
Before I could shoot with my new purchase I needed to get it serviced and replace the missing motor drive coupling cover. Reading a little more, I learned that my camera was fitted with an unusual focusing screen, a plain matte screen which lacked the usual split image rangefinder spot.
The F3 is highly modular. It’s 5 interchangeable viewfinders could be paired with 15 interchangeable focusing screens. These vary from the standard central split-image microprism rangefinder screen to those for very specific use cases such as close ups, astro and architectural photography.
Mine was fitted with a Type D, which is used for close ups and with long lenses. I called Greys of Westminster and ordered the more usual Type K type rangefinder screen, a new coupling cover and a -2 diopter.
It’s easy enough to remove the F3’s finder to change the screen. Sliding the grooved buttons on each side of the finder back towards the eye piece releases the front of the finder which can then be lifted out and removed.
All that remained was to take the body into my local camera shop, imagex, who sent it away for a much needed service, at a very reasonable cost of £69.
Adjusting to the F3
It wasn’t difficult to get used to the controls of the F3. They are simple and the dials on the top plate of were familiar looking, as I was shooting with the retro styled digital Nikon Df at the time, and the F3 only offers aperture-priority automation and manual operation.
I did fire the shutter accidently with the backup mechanical release lever (‘what does this lever do? doh!’) to the right of the lens beneath the ‘exposure memory lock’ button (AE-L on modern cameras).
LCD Display
The LCD shutter speed window in the finder isn’t especially bright and can be hard to read at times. There is button to light it up but its exceptionally hard to press and gives so little additional light that its not worth the effort. I actually prefer the needle matching system of the FM3A, FE and FE2, though that is even harder to read in low light.
80/20 Centre Weighting
An adjustment I thought I might need to make was to get used to the heavily centre-weighted metering system, apparently a request from Nikon Pros looking for greater precision. Metering is TTL and reads the light over the whole focusing screen, but nearly all (80%) of metering sensitivity is set to the central 12mm, whilst the rest of the screen gets the remaining 20%.
Nikon accomplished this weighting in an unusual way; by putting thousands of tiny little pinholes in the reflex mirror. These allow exactly 8% of the light to pass through the mirror and onto a metering cell. This didn’t make it’s way into subsequent models; the F4 reverted to 60/40. weighting.
In practice the heavy centre weighting can be useful, and certainly hasn’t presented a problem, even when I forgot about it, but that maybe because I shoot with very forgiving black and white negative film.
The F3 was the first in the F series to put the meter in the camera body. Previous models, which had the meter in the prism, featured 60/40 centre-weighted metering. This is also the case with the last of Nikon’s film cameras, the rather wonderful FM3A.
One little control that isn’t at all obvious is the Multiple Exposure Lever on the far right of the top plate. This enables you re-cock the shutter without advancing the film.
First Outing with the Nikon F3
Once the camera was back from service I bought some Ilford HP5 400 film and headed for the Victoria and Albert Museum, where I shot some of the statues in various galleries, whilst I also visited the excellent Paul Strand photographic exhibition. Initially I kept looking at the back of the camera to see what I had shot, only to be greeted by cardboard film type insert on the camera back. My first keeper is shown above – I really liked the grain and the tone of film and I was hooked.
From the Nikon F3 Onwards…and Backwards
Since I bought the F3 I have acquired several other Nikon film cameras, including the mighty F6 and the hybrid mechanical/electronic marvel that is the FM3A, all of which you can read about in detail on this site from the preceding links.
I’ve also gone back to the start of the F series with a late F from 1970 and an F2 from 1975, both of which are excellent cameras. I particularly like the way you can see rangefinder DNA in the F’s baseplate, which evolved from the Nikon SP rangefinder. The prototype for the F was built on an SP model, adding the distinctive mirror box and pentaprism of the SLR, and a new lens mount, the F mount. The letter F comes from re-F-lex.
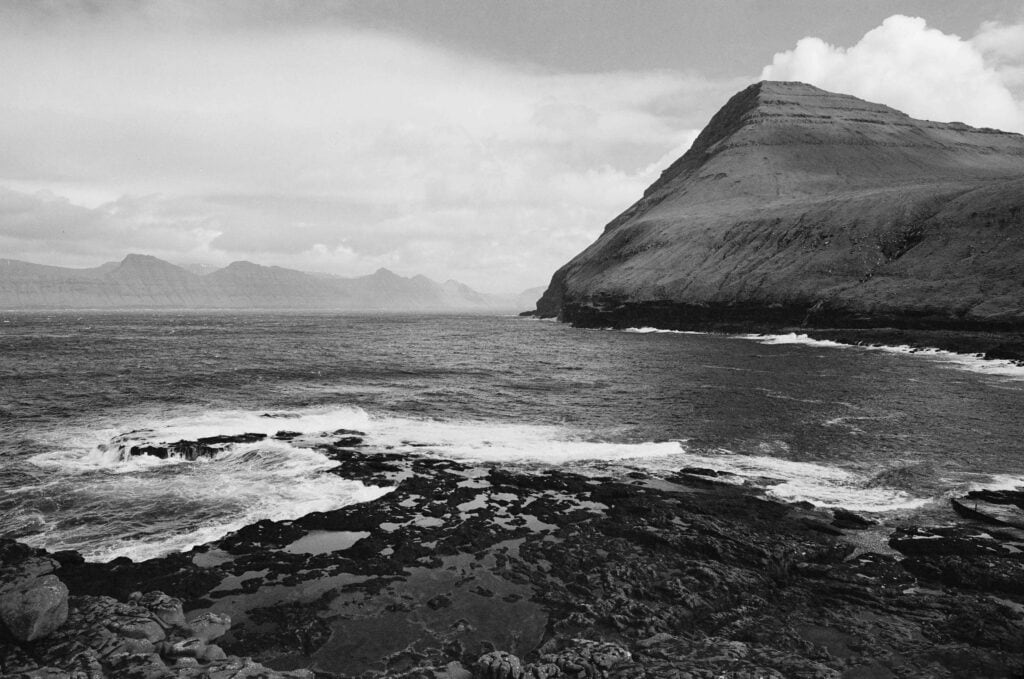
A scene from the Faroe Islands, shot with the Nikon F3
Though some of my photographer friends love the later Nikon F4 and F5, I have never taken to either of them – preferring either the earlier F, F2 or F3 manual focus cameras or the final F6 model.
I’ve taken the Nikon F3 with me when I’ve travelled, including some fairly harsh environments like the Faroe Islands, and it performed very well. I thought about taking my FM2n on that trip, as it is lighter, but the more rugged F3 inspired more confidence.
The Go Anywhere F3
The Nikon F3 remains one of favourite manual Nikon film cameras. Unlike other more expensive classics, such as Leica M6 or Nikon FM3A, which most photographers (including me) fret about in use, my F3 presents no worries at all. It is extremely rugged, affordable to service (or replace), and easy to use.
I bought it slightly beaten up and it’s so tough I am comfortable taking it anywhere. I have 50mm and 28mm (Voigtländer) pancake lenses to keep the form factor to a minimum – the F3 and both pancake lenses easily fit into a small camera bag. It is versatile: the shutter is fast (up to 1/2000 second), and though I haven’t needed them to date, there is a PC connection (though a flash requires an adaptor), and it will take a standard cable release. It takes great pictures. What more could you ask for?
 It’s been a while…